Showing posts with label Tutorial. Show all posts
Monday, May 27, 2019
Floss Swatch Project
This ongoing project has become my hands-down favourite new obsession! I was looking for a way to showcase the floss colours I own and play around organizing them in different ways without having to completely pull apart the three boxes of numerically ordered bobbins that I store my floss in every time the whim catches me.
I own almost every shade of DMC's six-stranded cotton embroidery floss - that's more than 400 bobbins of floss and while the storage boxes I use are great for keeping my colours in numerical order, it doesn't make it easy (or all that fun or photogenic!) to play around with new combinations. I own DMC's floss colour card and while it's a handy, irreplaceable resource, it too doesn't allow me to play around with putting different colours together - and (call me slightly crazy) but I do think that the colour of the floss just looks ever so different when it's stitched up than it does when it's wrapped around a bobbin or just hanging out in a skein - maybe it's the way the light hits the different direction of the stitch 'legs'?
I knew I wanted a stitched record of all the colours of floss I own, and I played around with the concept of one really big tapestry of each colour lined up in one big chart, just like the floss colour card - but quickly realized that wouldn't allow me to move things around and see how colours looked beside each other. What I really needed were small, stitched cards of each floss colour - like an embroiders version of Pantone colour chips - and so the Floss Swatch Project was born.
I love 14 count white plastic canvas for my swatches. It's cheap and so easy to work with - and best of all it doesn't fray or get bent or dirty. You can either stitch your swatches on one big piece of plastic canvas and then cut them apart, or cut small blanks and stitch as you go. Aida cloth would work too, especially if you used some Fray Check to keep the edges neat and tidy, but I must admit that the plastic canvas is my favourite for this project - it's just so easy!
Right now I'm just pinning the small number I have stitched up on to a corkboard so I can see them in all their glory - but once I have more completed I'll probably sort them by colour and store them in mason jars so they stay dust free and don't get strewn about the house.
Want to start a Floss Swatch Project of your own? Guess what?! We put together a resource so you can do that easily - and best of all? It's FREE! You can download the FREE PDF HERE - it includes a chart and instructions to stitch your own swatches and a handy printable chart of all the current DMC 6-strand Cotton Embroidery Floss colours so you can check off your progress - and yes, it includes the new colours released last year.
Don't use DMC floss? No problem! You can still use the PDF tutorial to stitch swatches with whatever brand of floss you prefer - there are plenty of checklists available online for each brand of floss, usually there's a free one on the manufacturers website.
Please, please don't forget to tag us on social media (we're @weelittlestitches on Instagram, @weelittlestitch on Twitter, and Wee Little Stitches Cross Stitch on Facebook) and use the hashtag #flossswatchproject and #fsp so that we can see your progress.
Happy Stitching! xox J.
- x - x - x - x - x -
Friday, October 10, 2014
Giant Cross Stitch Tutorial
Over the course of the year I stitch a lot of Pixel People - like, really super A LOT -- but never have I had more fun doing so then when I stitched up these giant Pixel People! Don't let the super size fool you, stitching these mega pieces is really no more difficult than stitching them regular sized. I've had so many requests for a tutorial that I just had to share. So here's how to make one yourself.
What You'll Need:
One of our patterns. We recommend starting with a Pixel Person who doesn't have any fractional stitches on them. For our samples we stitched Spider-Man, Wonder Woman, and Lumpy Space Princess.
A pegboard panel (often called 'perforated hardboard') It can be found at most home improvement stores. We get ours in 4x2 foot sheets for $9 each at Rona - a board that size is easily enough for a single, standard-sized Pixel Person. You can often get them pre-painted in white, or - more commonly - in the natural untreated colour.
White paint and a small foam roller - we used a high adhesive primer from Zinsser simply because that's what we had lying around the house leftover from recent renovations and it worked a treat, especially on the smooth surface of the pegboard. The paint is completely optional - if you're able to get pre-primed pegboard, or you don't mind the wood coloured background as is, you won't need the paint at all.
A jigsaw with a blade suitable for cutting masonite (that's what pegboard is made of). Most jigsaws come with an all-purpose blade which will cut just about anything - that's what we used and it worked just fine.
Fine grade sandpaper or a fine grade sanding block.
Safety glasses and a dust mask.
Worsted weight or bulky weight yarn in the appropriate colours. We used worsted weight yarn simply because, as a knitter, I already have tons of it lying around the house and it comes in such a wide range of colours. For this project I used mostly Caron Simply Soft - it's an easy to find brand and it's inexpensive. One skein of yarn in each colour will be more than enough to complete several giant Pixel People. There's no need to use expensive yarn for this project - just use whatever is cheap and plentiful!
Yarn needle - preferably one with a large eye.
Scissors.
A pencil.
Ready to Get Started?
![]() |
| Just a girl and her jigsaw! |
Firstly, a quick note about using the jigsaw. If you've never used power tools before this might seem super intimidating, but I happen to think this is a great chance for you to start! I come from a long line of woodworkers, so power tools are nothing new to me and I feel comfortable with them. A jigsaw is a small and portable tool so it's a little less scary than the big table saws and it's a tool which I happen to think is totally within the realm of a first-timer. If you can use an electric mixer, waffle iron, or blender then you can use a jigsaw.
Please don't be scared of power tools. Please don't think that you aren't capable of using one. There's a certain kind of satisfaction that comes from mastering the use of such a tool regardless of your experience or gender.
YOU CAN TOTALLY DO THIS.
I cut out all my pegboard, by myself, without any supervision or interference, while wearing a dress and lipstick (and safety glasses and a dust mask - it was a good look). You got this, girl. I have complete faith in you. If, however, you're still not comfortable using a jigsaw by yourself, by all means find someone with some experience using it to help you. Once you see how fun and easy it is, you'll probably want to give it a try too.
You can use hand tools for this project, but you may have problems getting a hand saw in to the little nooks and crannies of the Pixel Person shape. The nice thing about the jigsaw is that the little, thin blade fits into the holes in the pegboard, making it easy to maneuver it to cut the wonky outlines of your Pixel Person.
Alternately, you can just use the sheet of pegboard as is, centering your stitching on the rectangular pegboard the same way you would a piece of fabric.
Step One: The Prep Work
Before you do anything else, you'll want to print up the pattern of the Pixel Person you'll be stitching. The holes in pegboard are most commonly 1 per inch, meaning that our stitches will be 1 inch in size. It's pretty amazing to see cross-stitches so big! The math for figuring out just how large a stitched Pixel Person will be at this scale is simple - if they're 14 stitches wide then they'll be 14 inches wide.
To get the look we're going for you're going to need to cut the pegboard so that it has a border of 1 square all the way around the figure. You need that border so that your stitches are secure. I found it easiest to first draw the cutting line out on the chart so that I could see how everything was going to look and then draw out the shape I wanted to cut directly on to the pegboard to give me cutting guides.
![]() |
Trace one square all around the edge of the Pixel Person.
You may want to leave some extra 'rows' at the bottom to make your Pixel Person a little taller.
| ||
Copy the outline on to the pegboard, making sure it's exact. Don't forget you NEED that border of one square all the way around the design. Double-checking your cutting lines before you start cutting is recommended - once the pegboard is cut, it can't be changed so any mistakes need to be caught ahead of time.
Step Two: The Cutting
It's time to start cutting! You may want to do this step outside or in the garage as the jigsaw can be loud and the sawdust it kicks up does make a mess. You'll want to balance your pegboard on some workhorses or, if you're like me, on the edge of your patio table.
You should ALWAYS wear safety glasses when using power tools and especially when cutting wood. Yes, I know those safety glasses and that dust mask aren't sexy, but safety is -- so embrace it! Masonite pegboard is comprised of pressed wood fibres and when you cut it fine sawdust tends to get everywhere. It's very nasty and abrasive if it gets in your eyes and it can do some serious damage. I do also recommend wearing a dust mask when you cut too - just to keep your beautiful lungs beautiful and free of sawdust.
To start cutting I recommend finding a long stretch of outlined area to start with first. With the jigsaw off, nestle the blade in to one of the holes of the pegboard.
To cut your outline all you need to do is turn the jigaw on and cut from one hole to the next, trying to keep the line as straight as possible - go slowly and take your time. My jigsaw has two cutting speeds - fast and faster. I prefer the lower speed because it gives me more control. Depending on the size of Pixel Person I'm cutting out, this step takes me about twenty minutes start to finish.
I like to stabilize the pegboard with my left hand while the jigsaw is held in my right. Just remember to keep your left hand fingers far away from where you are cutting!

When you get to the end of your straight line turn the jigsaw off but leave it in place. Then just turn the corner, turn the jigsaw back on, and cut to the next turn - repeat that until you get all the way around the lines that you drew.
I like to think about cutting the pegboard as 'connecting the dots' with the jigsaw blade.
Make sure you turn off and unplug the jigsaw when you are done with it (or remove the battery pack if it's cordless). Never ever leave a power tool plugged in when it's not in use and never leave it unattended around children - even when it's unplugged the edges of the blade are sharp and can cause cuts, so please use caution. Power tools should always be stored away from where curious little hands can reach.
![]() |
| All finished! |
Step Three: The Clean-up
![]() |
| Smooth those edges. |
Before you can start stitching you'll need to clean up your piece of pegboard a little. Depending on your jigsaw blade you may find that the edges of your piece are a little ragged. A quick sand with a fine grit sanding block (or sandpaper) will take care of that little problem. The masonite sands really easily.
Cutting your pegboard kicks up a lot of dust so you'll want to wipe it down with a damp cloth to get off all that dirt and dust.
![]() |
| Uh Oh! Scratches! |
I was working with pre-primed pegboard to make Lumpy Space Princess, so it was handily already white - but the pegboard I had for Spider-man and Wonder Woman wasn't, so I primed it with my Zinsser primer after I cut out the shape I wanted. It took three coats to get complete coverage.
If you did use pre-primed pegboard you may find that your jigsaw has scratched a little of primed surface while you cut. Mine totally did. So I used a small foam brush and dabbed on a little white paint to cover those scratches.
You can also - if you like - paint the edges of the pegboard white if the raw wood colour bothers you. I did that for Spider-man but don't really think it's necessary. Most people are so focussed on how cool the giant cross-stitch is that they don't even notice the edges.
Don't forget to let all your paint dry before you start stitching!
Step Four: The Stitching
Yay! Congrats for getting this far. All the scary and loud work is over. Now comes the familiar part. Stitching a giant Pixel Person really isn't any different from stitching a regular sized one. Whether the cross-stitches are 14 per inch or just 1 per inch, it's all the same process!
I stitch my giant Pixel People at the kitchen table. For me it was easiest with the pegboard standing vertically. I put a towel down to protect both the surface of my table and the edges of the pegboard. It also make it nicer for clean up, since you may notice that a bit of sawdust has snuck in to the holes of the pegboard and having a towel down catches all that mess.
From here on out things are pretty standard. For my projects I used two really long strands of Worsted weight yarn held together and then doubled over to make four strands -- so you'll want to use a yarn needle with a nice big eye to help you thread it.If you're not a knitter/crocheter you may not own a yarn needle - you can find them in the same aisle of the craft store as the knitting needles. I like the blue plastic Susan Bates ones - they were just the right size.
When juggling a project this large in size you may find it easiest to use the 'loop method' of anchoring your first stitches (rather than the 'stitch over' or 'waste knot' methods). Doubling over two long strands of yarn gives us a chance to do this.
It may take a few tries to find a length of yarn which works for you and which you find comfortable. Just remember to take your time and try to get all your yarn strands to lie as flat as possible against the pegboard. This is a process known as 'railroading'(because the flat parallel strands of floss look like railroad tracks). People ask me all the time why my stitches look so full and this is my secret: I railroad them. It takes some practice to consciously create your stitches this way, but the more you do it the more proficient you become at the skill, and honestly it makes such a huge difference. You may find this YouTube video on railroading helpful (she starts the demo on railroading at 2:04) - the way she inserts her needle in between the floss strands is exactly the same way I do it. It honestly becomes second nature after a while. It's a little trickier with 4 strands of yarn than it is with 2 strands of floss, but with the stitches SO large on this project, it's well worth the effort.
From here on out all you have to do is cross-stitch, baby.
![]() |
| Lumpy Space for life! |
The finished project is well worth the effort! We'll be using ours as display pieces when we do conventions and craft shows but they would equally as cute in a kid's room or craft room.
We want to see your giant cross-stitch projects! If you post them on Instagram or Twitter please use the hashtag #weelittlestitches so we can see them too - or post photos on our Facebook page so that everyone can enjoy them.
Happy stitching!
<3 J&C
Monday, January 27, 2014
Working with Metallic Floss & a Fab Giveaway!
I love designing and stitching with metallic floss - it gives a little extra glamour to my projects that just can't be replicated with regular ol' cotton embroidery floss... but I happen to know that there are many designers and stitchers - both beginners and long-time pros - who would rather have a root canal than stitch with metallic floss...
I hear the excuses all the time:
It snags.
It unravels.
It's a gigantic pain-in-the-butt.
True. True. And definitely true... but it doesn't have to be that way! Trust me - I've got a few tips that will help big time and make you love working with metallic floss as much as it do. Heck, you'll be looking for an excuse to use it!
I prefer using DMC's Light Effects brand of metallic floss - it's easy to come by - usually available right alongside the normal cotton floss - and it's pretty cost effective. At a couple of dollars per generously sized skein, it fits right in with my budget. But the thing I like most of all about Light Effects is that it works just like regular 6-strand embroidery floss. It's divisible in the same way your normal floss is and is roughly the same 'weight', so I can use as many strands as I want/need in a project without having to worry about purchasing different sizes of braid like those offered by many other floss companies. That being said, there a lot of brands out there to choose from and, as always, you should work with the brand you like best. I've tried them all and each has it's pros and cons.
So let's address all the issues we have with metallic floss...
Excuse #1 - metallic floss snags
Yup, it sure does - but there's a reason WHY - if you look carefully at metallic floss you'll see that it's actually composed of a soft inside core around which is wrapped nylon metallic threads. It's the nature of that metallic outside thread that it has some rough edges compared to cotton floss and those edges can snag on fabric. That snaggy metallic nylon is what gives the floss its shimmer and shine, but it's really darn annoying to work with. We can combat a lot of that snaggy-ness (is that a word? well, it is now) by lubricating our floss and choosing the proper size of needle (more on needles later).
I like Thread Heaven for my lubricator - it really is like magic! If you're a cross-stitcher, hand quilter, or embroiderer and you don't own a little blue box of Thread Heaven I suggest you run out and get yourself some (I found mine at my local quilting shop). It's amazing. I don't use it with my normal cotton floss when I cross-stitch because I don't think it's necessary (although you certainly could and there are plenty of stitchers who do), but I swear by it when using metallic or nylon floss! I don't know what it's made out of... some kind of lovely magic silicon or something, but it works a real treat! It not only helps to keep the metallic floss from snagging so much, but it also keeps it nice and shiny! Best of all it isn't sticky, doesn't smell, and doesn't effect the colour of your floss or fabric. I've had my box of Thread Heaven for 4 years now and there's still lots and lots left to work with so a little does go a long way - and trust me, I stitch a LOT more than the typical crafter.
Excuse #2 - metallic floss unravels
Yup, it sure does - for the same reason that is snags - the outside layer of nylon often separates from the softer inside core. It's frustrating and upsetting and makes even the most seasoned stitcher want to pull her hair out and run screaming from the room. So here's where I impart my most secret of stitching tips with you... the true secret to working with metallic floss is all in how you thread the needle..."But I already know how to thread a needle" you're thinking - you run the floss through the needle, and then leave a little tail hanging down, which you gradually use up as you stitch. That traditional method works just fine for normal thread or floss, but threading your needle that way when working with metallic floss actually contributes to the unraveling problem - the outer layer of sparkly nylon wraps around the core like the stripes on a candy cane and so is actually much longer than the inside core of the metallic thread - When we thread our needle the traditional way (with a long tail) and work the thread through the fabric, the pulling friction makes the floss unravel a little more with every pass, resulting with a frayed and messy length of floss which often makes us want to cry.
Excuse # 3 - it's a gigantic pain-in-the-butt
Yup, it sure is - but only if you let it be. Let's learn how to tame that metallic thread!Here we go...
Collect together all the things you'll need to complete your stitching - your pattern, hoop, fabric, thread conditioner, metallic floss, and needle. You may want to use a slightly larger needle than you normally do when you stitch - or at least one with a larger eye - even if you have to break in to your stash of sewing needles with pointed ends, rather than cross-stitch/tapestry needle with the blunt end that we usually use. Because metallic floss is a wee bit thicker and not as pliable as cotton floss, it can often be tricky to thread it in your needle - especially when you use the trick I'm about to show you. If you're having a hard time threading your needle, change it up to one with a slightly bigger eye.
A bigger eye also has another benefit - it widens the hole you're passing the floss through ever so slightly, meaning that the metallic floss has more room to pass through - so it reduces the friction of floss against fabric and therefore reduces the snagging (see, I told you we'd get back to this). I normally use a pretty small needle when I cross-stitch - I like a size 28 - but when I stitch metallic floss I go up to a size 26, or even a size 24 if I'm having a hard time.
Cut yourself a length of metallic floss - I actually like to keep my floss pretty short which helps to reduce the tangling issue. We're going to double up a single strand of floss though, so cut a length which is twice as long as you'd like your working floss to be - for me that's the length of my arm to almost mid-chest - 22 inches (yes I'm short) - giving me 11 inches of working floss, a length I find just perfect.
Separate a single strand of floss and run it across your Thread Heaven - I pass it over twice, once in each direction, sandwiching the floss between my finger and the Thread Heaven - and then run the strand through my fingers a few times just to work the Thread Heaven in. You may find that the floss is already starting to unravel a little at the ends - don't worry, we're going to take care of that.
Fold your floss in half - lining up the two live edges. When I thread my needle I like to work not from the end with the live edges, but from the loop end - it's a lot easier and you don't have to worry about trying to get all the fraying live edges through your needle eye at the same time - what a headache that would be. By using the loop end to thread our needle we can stay away from the fray... plus, we want the needle to be at this end of the floss.
Okay, this is where things get different than normal - we actually want to knot the loop end of the floss through the needle eye in such a way that it holds the floss completely in place - this is the secret of how we keep it from shifting and unraveling as we work.
I've taken some photos using a larger needle and yarn so you can get a better idea of how this will work - it's a lot easier to see at a larger scale. Click on the photo to make it bigger and walk yourself through the steps...| the 'knotted' thread and needle eye |
This is actually my preferred method for threading my needle when I stitch - I often thread my normal floss this way too, especially when I'm stitching in a hurry - if you're the sort of stitcher who has a hard time keeping your floss on their needle or keeping your stitches even then you may want to consider always stitching like this. It's also a great method for when you're teaching young kids to stitch as they can't lose their needle.
Then all you need to is trim the live ends of the floss so that they're all even and start your stitching, anchoring those pesky live ends under the first few stitches, just like you do when you're cross stitching with normal cotton floss (remember, we don't knot the end of our thread when we cross-stitch). By doing it this way you have completely eliminated those live ends so nothing can unravel. There's no fraying because there are no live ends!
Here's a little free pattern for you to practice your metallic stitching with. You can stitch it in any colour you please! It's a quick little project you can finish in easily less than half an hour.
I had help with mine. Also, yes I do take all my photos on my livingroom floor!
What you end up with a sweet little project with a pretty sparkle that's completely stress-free!
And the best part? You can win one of two metallic floss gift packs (4 of our favourite colours of metallic floss and your own box of Thread Heaven!!) as a gift from us! Just leave a comment on this blog post and we'll draw two winners on February 7th!
![]() |
| leave a comment below to enter to win! |
Happy Stitching!!
<3 J.
Saturday, December 7, 2013
Free Buddy the Elf Pixel Person Patterns + a Giveaway + a Wee Tutorial
Here at Chez weelittlestitches we just love Christmas! It's the time of year where we can get crafty and make some really fun gifts for all the important people in our life. In the past those people were limited to our family and friends, but a few years in to this Etsy thing and now those important people include you!! Because we have such lovely and supportive customers we're able to make a go at this business thing, and because of you we've seen this venture grow every year.
We truly wish we could stitch something from the heart for each and every one of you - but since we can't, we'll have to settle for the next best thing. We might not be able to make you a hand-stitched gift, but we can give you the means to make one for yourself (or for someone you love). The holidays should be about kindness and laughter and love -- they should be about giving a little part of yourself to the people who are important to you.
So, in the spirit of the season we're giving you 3 free patterns featuring the very sweet Buddy the Elf from the Will Ferrell holiday movie Elf!
![]() |
| download pattern here |
![]() |
| download pattern here |
![]() |
| download pattern here |
And to really make things exciting we're also having our very FIRST giveaway... (giveaway now closed - thanks!)
Want to know how to make your own cute Quoteable hoop?? Here's how:
Stitch Buddy on a piece of coloured Aida and the quote on a separate scrap piece of white aida - this is a great way to use up all those extra little scraps that always seem to be lying around.
Apply a liquid fray check product - we love Dritz' version - all around the outside edge of the quote, making sure you get every corner really well. You want to apply the fray check to the fabric, not the stitches.
Alternatively, you could stitch the quote on white 14 count plastic canvas and skip this step altogether!
Wait for the fray check to dry and then carefully cut out the quote, leaving at least one row of squares between the stitching and where you cut the fabric.
Then just sit back and enjoy the festive cuteness!!
And check out our other Quoteable Pixel People and Pixel People In Love designs for other patterns which would be super adorable done this way.
Happy Holidays xox J&C
Sunday, October 28, 2012
How To Redeem Coupon Codes on Etsy
We love having sales in the Etsy shop! It's great that Etsy gives us the option of deciding how much of a discount to apply to transaction which the customer can utilize for themselves when they're shopping - it means we don't have to manually change the price of every single one of our listings (all 100+ of them) every time we want to have a sale. But using coupon codes during the checkout procedure can be confusing for customers who've never used them before - so here's our little tutorial on how to redeem coupon codes in any shop!
Firstly, fill your cart with all the items you wish to purchase during that transaction. You'll be directed to the checkout page every time you add a new item - if you want to buy more than one item in a transaction just click the grey "keep shopping" button on the top right-hand side of the screen and shop until your heart's content.
Once you've added all the items you want to purchase stay on the checkout screen.
See that line of blue text which says "apply shop coupon code"? Just click on that and a little blank box will open up. Type in the coupon code provided by the shop owner and hit "Apply".
If the coupon code is still in effect (and if you've spelled it properly) Etsy will tell you the percentage that you've saved and then break down the exact dollar amount for you. If you don't see these options then either the coupon code has expired because the sale is over or you've misspelled the code - once you get it right you can hit the green "Check out with Paypal" button and Etsy will walk you through the remainder of the transaction.
That's all there is to it!
Happy shopping & happy stitching J&C
Firstly, fill your cart with all the items you wish to purchase during that transaction. You'll be directed to the checkout page every time you add a new item - if you want to buy more than one item in a transaction just click the grey "keep shopping" button on the top right-hand side of the screen and shop until your heart's content.
Once you've added all the items you want to purchase stay on the checkout screen.
![]() |
| Hit "apply coupon code" |
See that line of blue text which says "apply shop coupon code"? Just click on that and a little blank box will open up. Type in the coupon code provided by the shop owner and hit "Apply".
![]() |
| Type in the coupon code - spelling counts! |
If the coupon code is still in effect (and if you've spelled it properly) Etsy will tell you the percentage that you've saved and then break down the exact dollar amount for you. If you don't see these options then either the coupon code has expired because the sale is over or you've misspelled the code - once you get it right you can hit the green "Check out with Paypal" button and Etsy will walk you through the remainder of the transaction.
That's all there is to it!
Happy shopping & happy stitching J&C
Saturday, September 8, 2012
Our Favourite Cross-stitch Resources
There are a lot of cross-stitch resources online - A LOT. Which means that if you're looking for help or the answer to a question then the internet is a great place to go... if you have the patience for wading through a ton of crap and ads and spam!! Over the years we've amassed a little stash of bookmarked pages which we refer to again and again. In the spirit of goodwill we'd like to share them with you.
How To Cross-stitch (aka: what have I gotten myself in to?)
We <3 Mochimochi Land! Mostly known for their super cute knitting patterns, they have a great little "how to cross-stitch" tutorial too!
Another really great quick and easy little "how to" tutorial can be found over at The Making Spot - plus it's the blog for our fav cross-stitch magazine EVER (that's the UK's Cross Stitcher) so besides the tutorial there are tons of cute patterns you can download - as well as some great little freebies too!
Fractional Stitches (aka: what are those weird half-blocks on the pattern?!?)
This is probably the question we get asked the most and I do keep meaning to do our own tutorial for it, but in the meantime we like Yarn Tree's simple tute on those odd little fractional stitches.
French Knots (aka: oh gawd, why does the pattern designer hate me so much?)
Not to toot our own horn, but I think our Fear Not the French Knot tutorial is pretty good - and if pictures aren't enough for you, there's even a video too - just don't make fun of my Canadian accent!
We have plenty of other tutorials on this blog too if you're looking to take your cross-stitching to another level. Try using waste canvas to cross-stitch on anything. Play with scale to create something teeny-tiny, or mega huge! Make your tech that much cooler with stitched accessories. Or liven up your life with painted fabric.
Remember - the Etsy shop is on vacation from September 8th to the 15th, but you can still buy our patterns for instant download at our Craftsy Shop or our Kitschy Digitals Shop.
Happy stitching!
J & C
Sunday, August 12, 2012
Fear Not The French Knot
There are very few stitches in the embroidery world which inspire as much fear, trepidation, and hatred as the dreaded French Knot. So many of us find them so frustrating that we avoid them at all costs! But fear not my stitchy darlings.... once you get the hang of this handy little stitch I promise you'll be finding excuses to include them in your projects. In the embroidery world (especially in cross-stitch) we always talk about avoiding knots in our work... so putting one in intentionally can be a little scary.
French Knots aren't that difficult, I promise. But they do require a little practice. If you've struggled with them (or avoided them completely) in the past now's the time to hoop up some extra fabric and give them another go.
I found that the best secret to French Knot success is to use two hands and allow yourself a manageable length of floss - not too short and not too long. I like to leave them until last in my project - not just because they require my full attention, but because hooping over top of them will ruin all your hard work.
Okay... take a deep breath, free up BOTH of your hands (I balance my hoop on my knees), and let's get started.
The size of your French Knot is determined by two factors - the number of threads you're using and the number of times you wrap said thread around the needle. The more strands and the more times you wrap it, the fatter your knot will be. In cross-stitch I tend to use a singular strand and wrap it around the needle two times. This makes a nice tidy, tiny knot. If you're just starting out and using a practice piece of fabric you might want to choose two strands of embroidery floss because the fatter the knot the less chance of pulling it through the hole in the fabric and ruining the stitch.
Bring your needle up through the fabric (from the back) in the place indicated by the pattern. Here I'm dotting the "i" in the line of text. Pull the length of floss all the way through.
I'm right-handed so I hold the needle in my right-hand the length of floss in my left. If you're left-handed all you need to do is reverse that.
Still holding on to the length of floss with your left hand, insert the tip of your needle back in to the fabric at the same hole you came up through. Don't let go of the floss with your left hand!
With your left hand gently pull the wrapped floss down your needle until it sits against the fabric. This ensures the knot is neat and tidy against your stitching.
As you draw the floss through you can see the knot forming. I keep my left thumb controlling that floss for as long as possible. Once you've got your floss pulled almost all the way through you can release with your left thumb. Resist the urge to tug sharply on your floss as you reach the length of it - not only does that tighten the knot you've just completed and make it smaller, but you risk pulling it through to the backside of your project. I think pulling to tightly is the mistake people make most often. If you go slow and gentle with your draw through you'll do just fine.
And that's it! I swear, it really is that easy! And just in case you like to see things real time, like I do, I even made a video for you to watch. Just ignore the sound of traffic in the background and the fact that I really need a manicure! :D
I know you can do this. It really isn't as hard as you might think and the satisfaction of mastering this new skill is worth the effort. I love French Knots - I love the way they look, I love the process of stitching them. I hope you'll learn to love them too.
Monday, July 16, 2012
How To Cross-Stitch Anything
Once you've mastered stitching your designs on Aida cloth you're ready to branch out into the very exciting world of waste canvas! What is waste canvas, you ask? It's a temporary grid which allows you to cross-stitch on anything. Yup, I said ANYTHING. Gone are the days when you are limited to only hanging your cross-stitch on the walls!
Working with waste canvas is really easy once you get the hang of it. Before you know it you'll be stitching yourself t-shirts by the dozen. That being said, it does take a little getting used to and we don't recommend it for your first cross-stitching project. But if you've tackled a couple of stitching projects already and want to move on to something else, then waste canvas is for you!
What you'll need:
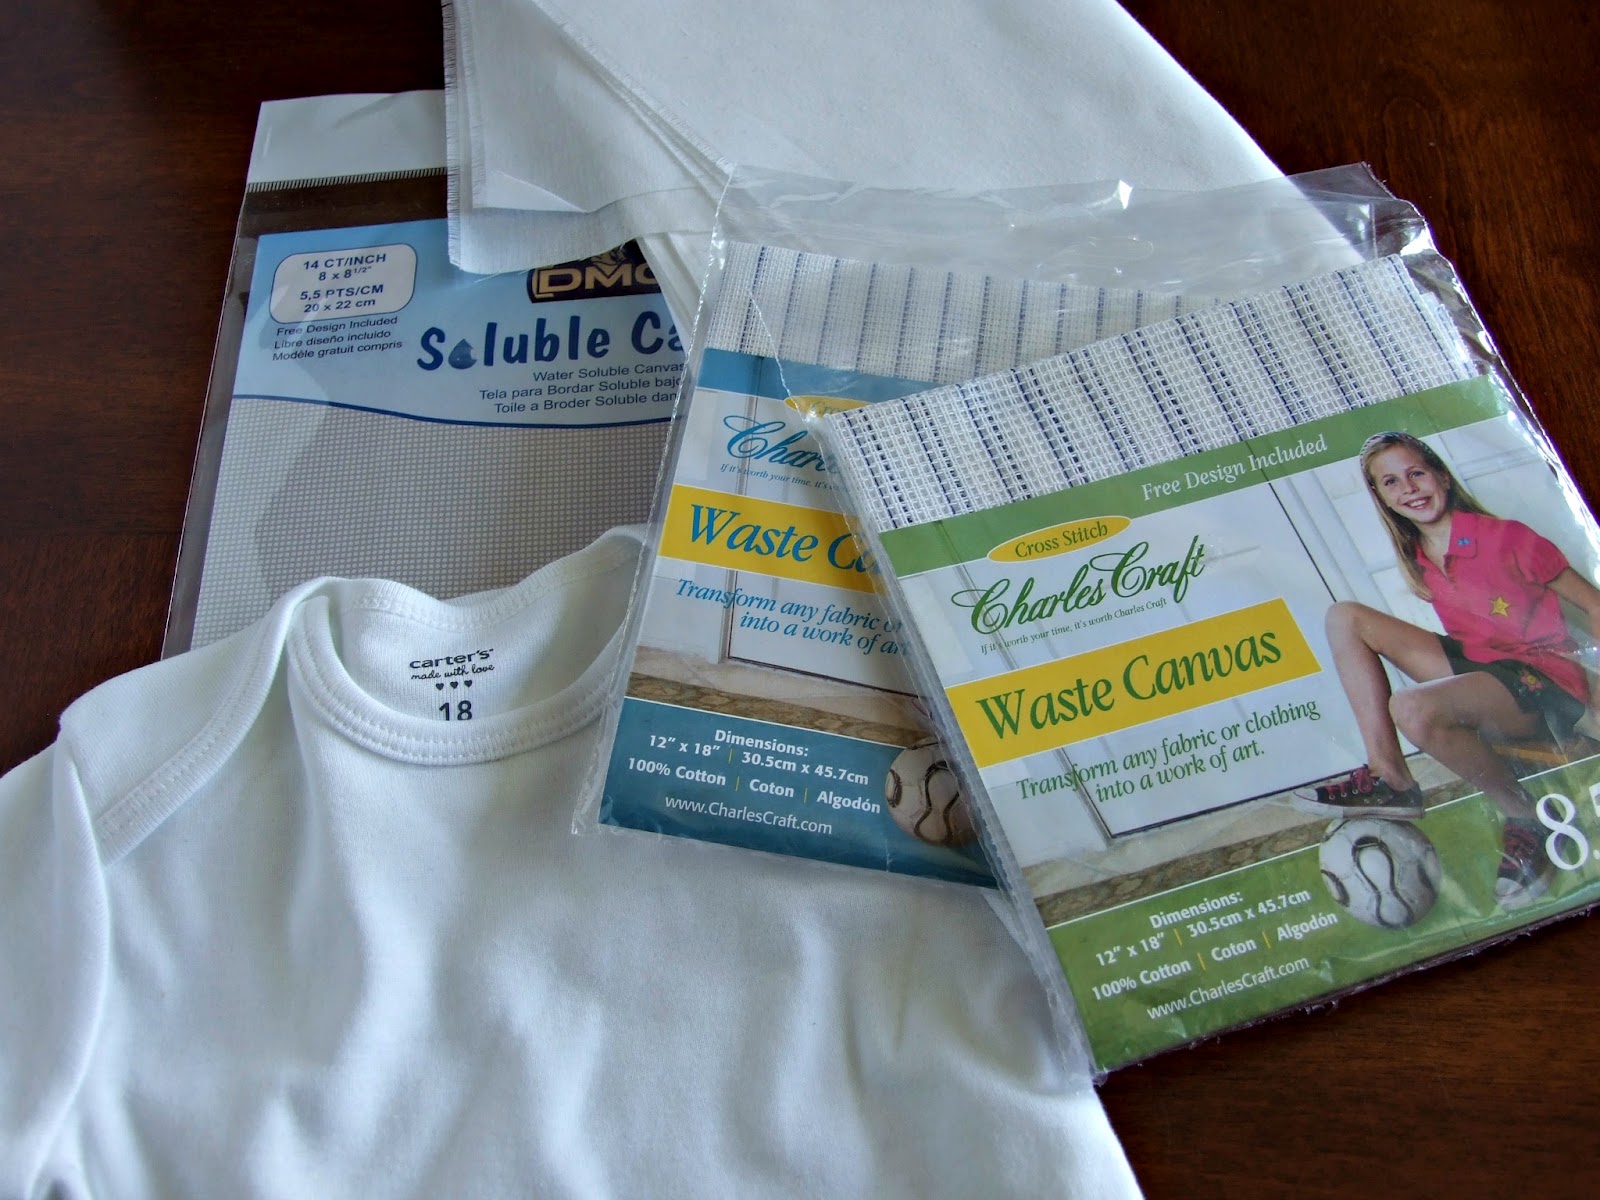
- something to stitch on - today we're working on a blank baby onesie. We're always on the look-out for blank items to stitch on. Micheal's Arts and Craft stores have a great selection of different coloured blank t-shirts for kids and adults, but blank baby items are trickier to find. I've had luck finding blank white baby onesies at Bonnie Togs stores (in Canada). There are online sources as well, but I've never used any of them and can't speak for their quality. Waste canvas allows you to stitch on anything your little heart desires, but we do recommend that if you'll be washing the item frequently that you keep your fibres as consistent as you can. We like stitching on cotton because embroidery floss is also made of cotton and sometimes laundering different fibers together is a recipe for disaster. We've never had a problem with t-shirts which contain a little bit of spandex or rayon, but we do recommend that you try to find a t-shirt which has as high a cotton content as possible. While I have seen some lovely stitching on silk, remember that more delicate fabrics don't always hold up to the constant piercing of your needle - the sturdiness of cotton - be it a t-shirt, denim, or a heavy twill - works well for stitching.
- waste canvas - it's easily available in two counts - 14 and 8.5 - we use Charles Craft brand waste canvas which we get at Michael's Arts and Craft stores - it's in the same aisle as the embroidery floss and Aida cloth. 14 count is the size you're more than likely used to working with - today however we're going to be using 8.5 - the stitches will be almost twice as big as 14 count - not only does that make it a little easier for the first-timer to see, but it makes one singular Pixel Person more significant in scale - and, let's be frank, super cute! DMC has also just come out with water soluable canvas which is available in 14 count. It's considerably more expensive than the traditional waste canvas and comes in smaller pieces. We haven't tried it yet and it works a little bit differently, so for the purposes of this tutorial we're going to stick to the regular ol' waste canvas.
- sew-in interfacing/stablizer - if you're stitching on anything which has even the littlest bit of stretch - like a t-shirt - you MUST use interfacing. Interfacing is a non-stretchy fabric which we use to stablize the stretchy fabric of the t-shirt enough so that it can be stitched on. Do you have a shirt with embroidery on it already? Turn it inside out and you'll notice that there's white fabric-y stuff beneath the stitching - that's interfacing - almost any stretchy or delicate fabric which has been embroidered, whether by machine or by hand, will have used interfacing. Your stitching will be all wonky and funny-looking if you don't use interfacing to back your stitches. You can purchase sew-in interfacing at any fabric store and even sometimes at Walmart in the crafting section. It usually really inexpensive. I buy great big chunks of it for only a few dollars a meter. I like a nice medium-weight interfacing. There are several different types of interfacing including some which you can iron on - you don't need to spend the extra money for the iron-on or self-stick kinds because you're going to be doing lots of stitching which will hold it in place.
- straight pins
- a sharp embroidery needle - Sharp?? you ask questioningly. Yes, sharp. Normally we use blunt tapestry needles for cross-stitch, but that's because the holes on even-weave canvas already exist. When you're stitching through something that doesn't have pre-made holes you're gonna want that sharp needle. Try to find one which passes through the smallest holes in your waste canvas without stretching them out of shape too much - trust us, this will help keep your stitches neat and tidy.
- an embroidery hoop large enough to contain your entire design. Not only is it nice not to have to move your hoop six times while you stitch, but if you hoop overtop of finished stitches you risk warping your waste canvas and throwing your stitches out of line.
- a pattern - today we're using Batgirl from our Batman & Friends pattern. For your first time using waste canvas we recommend a smaller scale project - while something big like our Eleven Doctors pattern would be amazing on a t-shirt (we've seen it done and it's kick-ass!) if you've never used waste canvas before then smaller is better.
- embroidery floss in the recommended colours. Don't use cheap floss - now is not the time to break out the floss you bought at the dollar store - if you're stitching on something which will be laundered use a reputable brand of floss which is colour-safe (it'll say so on the label) - it would be awful to invest all that time in stitching only to have the colours bleed and ruin everything the first time you wash it. We use DMC brand floss. It is wonderful and has never bled on us.
Alright, Let's Get Started!
If you're stitching something which will be laundered make certain you also wash it before stitching. While most garments are pre-shrunk there's no guarantee that yours is - and if it shrinks after you've stitched it the garment will be ruined. Plus you want to make certain that any excess dye has been washed out of the fabric before you stitch on it - otherwise the dye will discolour your stitches and that's not cool. It's quite common for manufacturers to over-dye their garments so make certain that the wash water runs clear before you stitch on your fabric!! It might take more than one wash to accomplish this. Really you should always wash a new garment before wearing anyway - I used to work in fashion retail and you wouldn't believe what sort of chemicals they dose your clothing with - especially if it comes from overseas - it's often covered in pesticides and other nasty things. Trust me.
Iron your freshly laundered item - if not the entire thing then at least the area you'll be stitching. Wrinkles = bad. You wouldn't want to stitch over one and make it permanent!
| cut your waste canvas and interfacing the same size |
Cut your waste canvas slightly larger than your design area. If you're stitching one of our charts, the pattern indicates the size of the design on the information page. Keep in mind that those measurements are for designs stitched at 14 count. If you are using 8.5 count or only part of a design you will have to do a little mathematics to determine the size of the stitching area. Let me show you how that works: I counted and Batgirl is exactly 36 stitches high and 12 stitches wide. On 14 count she would be 2.57" x 0.85" (36 ÷ 14 = 2.57; 12 ÷ 14 = 0.85). On the 8.5 count canvas we're using today Batgirl is 4.23"x 1.41" (36 ÷ 8.5 = 4.23; 12 ÷ 8.5 = 1.41). You'll want to cut your waste canvas an extra couple of inches larger all around than your design area and then cut a piece of interfacing the same size.
| The green-headed pin marks the centre of my waste canvas |
Honestly the hardest part of stitching with waste canvas is getting it centered on to your t-shirt. Mark the centre of your cut piece waste canvas just as you would if you were working on Aida or linen. Deciding where to place your motif on your t-shirt is a matter of personal preference. I tend to just eyeball it, but you should probably measure the width of your t-shirt to determine the centre point. Or, if you like a quick fix you can just fold it in half and find the centre that way!
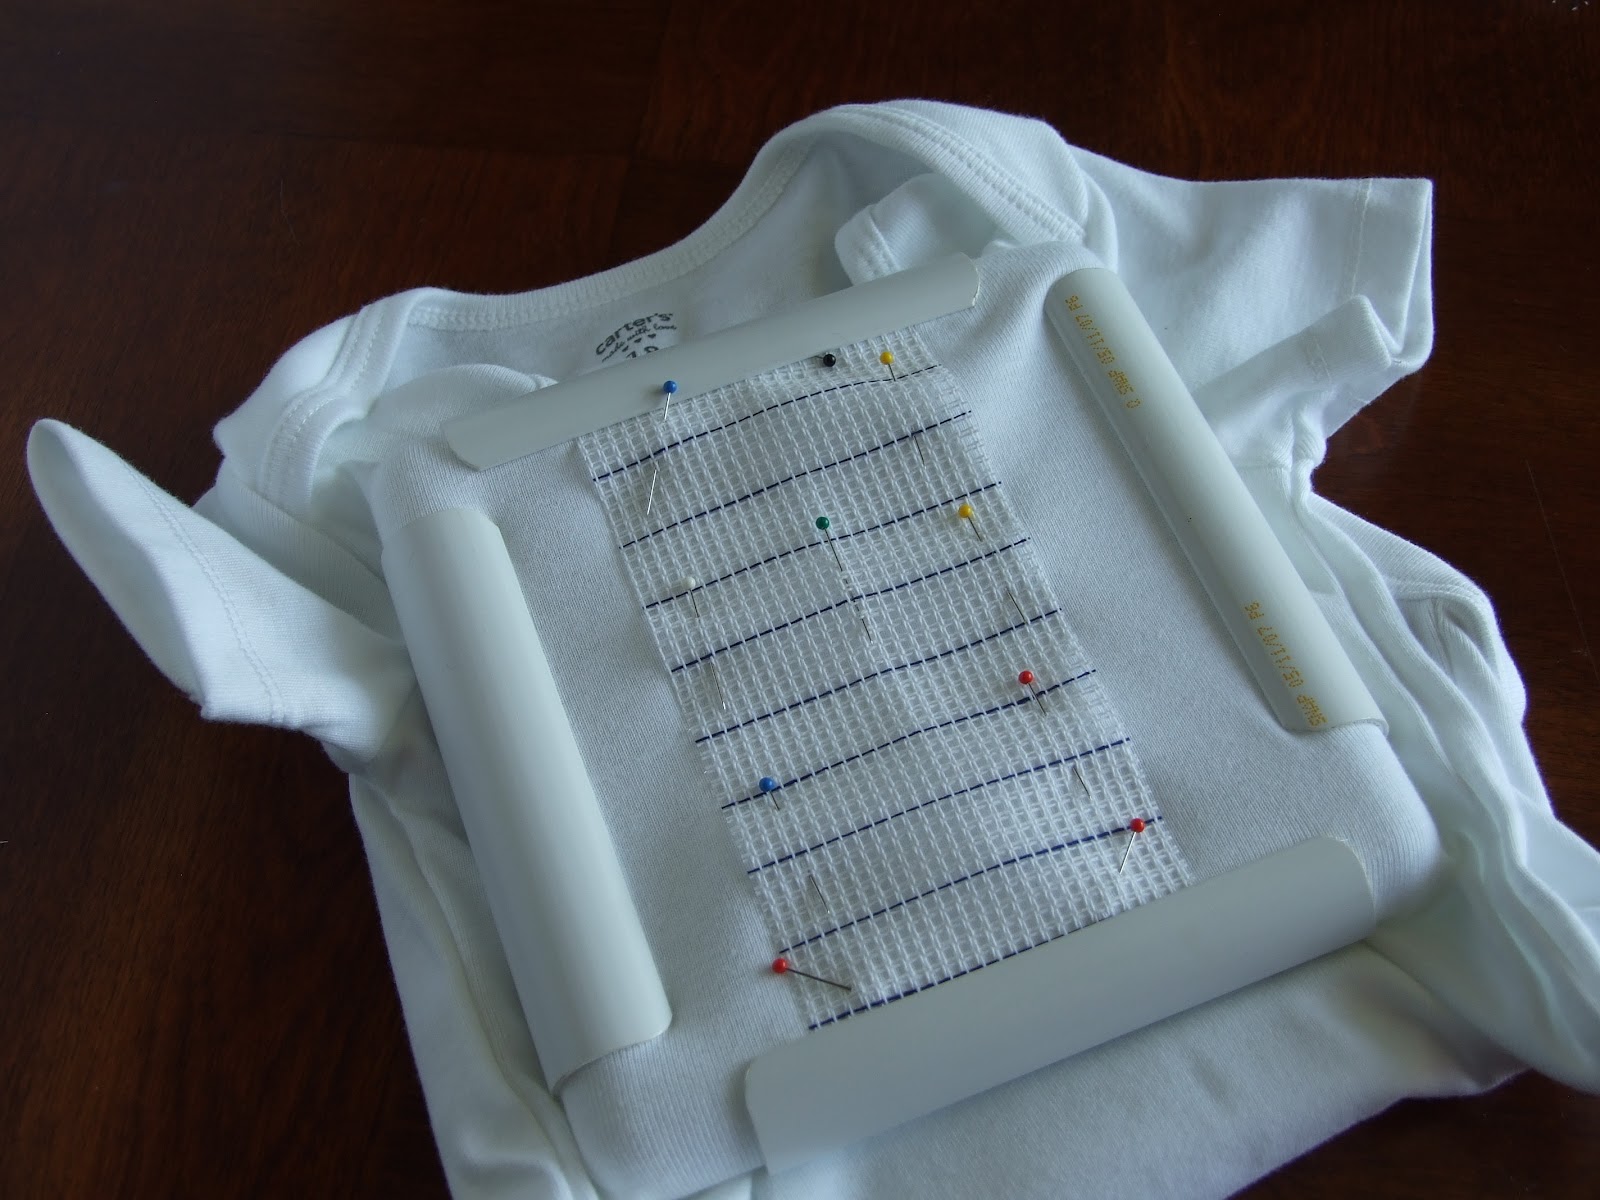
When we tack our waste canvas to our t-shirt we want to make a little sandwich of the layers which goes like this:
waste canvas
top layer of t-shirt
interfacing
Remember, you're only stitching through the waste canvas, the top layer of your tee, and the interfacing... NOT the back layer of the tee too... you do need to be able to wear it!
Try to do your best to keep your waste canvas/interfacing lined up properly - both centered on your tee, but also kept straight on the hoizontal as well - otherwise your stitched design will be crooked! Like I said, this is definitely the most difficult part of working with waste canvas. I often have to re-pin my sandwiched layers several times before I get it perfectly straight, but then I'm a perfectionist.
Once you're happy with your placement you'll want to temporarily baste all the layers together so they don't slip while you stitch. If I'm working on a small scale project like today's stitching, I'll be lazy and just leave my pin basting in - I make sure I use a lot of pins! If you're stitching something larger though you'll want to baste-stitch the layers together using sewing thread in a contrasting colour like this:
You'll remove those basting stitches before you complete your tee.
Hoop your stitching area, being sure to keep the waste canvas grid as square as possible. It is easy to pull it a little wonky - and wonky waste canvas = wonky stitches. You'll want to remember that your inside hoop goes inside the tee shirt, not at the back of it - you don't, don't, don't want to stitch through both the front and the back of the t-shirt!!
I know this seems like a lot of work, but proper preparation makes everything so much nicer.
Okay.... time to stitch!
Let's take a minute to understand the temporary grid that is waste canvas. If you're accustomed to stitching on Aida cloth or linen at first glance there seems to be a LOT going on with the weave of waste canvas. Panic not. It's actually quite simple.
![]() |
| Your needle will go through the smallest size holes in the grid |
![]() |
| Each stitch goes from one of the smallest holes to the next |
![]() |
| And then back again! |
| The dark blue thread woven in to the waste canvas mark every five rows |
Take your time and be mindful of how you lay each stitch - even though you've tacked the waste canvas down it can go a little misshappen from being handled so much - try to keep the horizontal and verticle lines of the canvas as straight as possible so your stitches are also as straight as possible. Motifs stitched with waste canvas can look messy if your stitches are placed inaccurately. When two or more stitches share the same hole in the canvas make certain your needle enters the fabric in exactly the same place each time.
Keep the strand of your working floss relatively short - the more a length of floss is passed through fabric the more it can dull and fray. In even-weave fabric like Aida, the hole is already made and so the floss can pass through with less friction, but when you're stitching on solid fabric there is more stress on the floss as you pull it through - if keep your floss to a manageable length your stitches will look nicer.
I like using three strands of floss when I stitch with waste canvas (I usually just use two when I stitch on Aida). On 14 count this makes the stitches nice and full and almost completely covers the colour of the t-shirt beneath. At 8.5 (like we're using here) the stitches are a little less full so that you can see the white tee beneath - personally I like it that way since it's sort of cool to see each individual stitch at such a large scale, but if you wanted fatter stitches you could certainly use 4 strands of floss. For backstitching I like to use 2 strands so you can see those details from far away.
Really from here on in it's just like normal cross-stitching.
| Progress! |
Once you've completed all your stitching it's time for the fun part!
| All done! |
Unhoop your stitching and if you've basted your waste canvas down with stitches now is the time for you to remove those. Or if you're me, you just take out all the pins.
Removing the waste canvas is definitely the best part of stitching - there's something very satisfying about it. The waste canvas brand we use recommends dampening the canvas to release the starch which holds it together - normally I don't even have to do that, but of course you can if you like or if the grid is being stubborn. If there's a lot of empty waste canvas around your design you can (carefully!) trim it closer to you stitching - you don't want to trim it too close though - not only does that run the risk of accidentally cutting a stitch, but you'll need a little of the waste canvas to hold on to so you pull the strands free. If you've stitched more than one motif it also sometimes helps to cut the waste canvas inbetween each motif (if there's room) so that you're removing shorter strands instead of great big long ones.
You want to pull each individual strand of the waste canvas out from underneath the stitches you've made as carefully as possible - the best way to do this is to pull out from the side, try not to pull up. I like to start with the shorter strands first - once they've all been removed it's much easier to pull out the longer strands.
Yes, you do actually have to pull each strand out individually - it sounds tedious but I find it really fun. You can use tweezers if you find it helps you grasp each strand - just don't use your good, expensive ones - don't ask me how I know that. If you come across any stubborn strands try wetting your canvas again and waiting a minute - or try pulling it free from the other side. Sometimes the strand breaks - don't panic. Try pulling it free from the other end instead. If that doesn't work you can always trim it really close to your stitching.
| shorter strands first |
| then the longer strands |
| All done!! |
If you like you can also trim the interfacing on the inside of your t-shirt so that it's closer to your design.
The only thing left to do is turn your piece inside out and iron out the hoop marks from the backside. You should try to avoid ironing the front of your stitches - it smushes them down and makes them look messy!
Caring for your finished item:
You'll want to wash garments inside out to protect the front of your stitching. Machine washing should be okay if the fabric you stitched on is safe for that method. We do like washing in cold water as a bit of a fail-safe against any further shrinkage, but that's not strictly necessary.
Skip the dryer - not only is air-drying better for the environment, but it keeps your colours bright and again prevents any further shrinking of your garment!
Avoid washing your garment along with anything which might catch on the stitches - like shirts with sequins, anything with a zipper, or your bras. If you find your stitching has gone a little wonky in the wash you can reshape it while it's wet. Drying your garment flat helps too. We also stay away from hanging any garment which we've stitched on - while your interfacing backing should prevent the stitches from stretching out of shape, the remainder of the garment may do so and that will just look funny. We always fold our stitched pieces for storage.
OMG! What else can I cross-stitch?!
Anything, my darlings, anything. We've stitched t-shirts and sweatshirts. Ballcaps and blue jeans. Skicaps and shoes. Tote bags and messenger bags. Aprons and napkins. Basically if it's thin enough to get your needle through comfortably you can stitch on it!
And if the item you'd like to embellish is too thick, too awkward, or doesn't stand still long enough to stitch on try making an applique using waste canvas and felt. This is one of our favourite methods for baby items and kids shirts because you can remove the applique once they've outgrown the garment and sew it on to another!!
| Stitch on felt, cut it out, and applique it to ANYTHING! |
| A few simple running stitches will attach Boba Fett to any item. |
That's it! Happy stitching!
Oh, and we would like to take this opportune moment to remind you that all of our patterns are for personal use only. You can make all the tees you like for you, your family, and your friends (and we hope you do!), but we ask that you not sell anything made with our patterns. Thanks! J&C
Subscribe to:
Posts (Atom)