
I hummed and hawed and experimented for a good long while before I finally came up with a method for colouring my own Aida cloth. I tried dyeing it (it is 100% cotton, generally) but couldn't get a consistent saturation of colour - and while that works quite well for some designs, I didn't want the fabric to compete with my simple cross-stitch patterns so much as compliment them - enter my method for painting Aida...

This is what you need:
~ White Aida cloth in the count you prefer - we almost always use (and design with) 14 count.
~ Regular ol' acrylic craft paint (available at pretty much any craft store - although we don't recommend using dollar store craft paint... go ahead and ask us how we know that).
~ Textile Medium Liquid - usually found in either the fabric paint aisle or with the acrylic paints - we use Delta Ceramcoat and we love it. We buy it at Michael's.
~ Foam paint brush and a small container to mix your paint in.
Okay... let's take a quick break to answer a few questions you undoubtedly have.
1. Why the heck don't you just use regular fabric paint? 'Cause it's expensive and we're cheap. Acrylic paint is much cheaper than fabric paint, comes in a wider range of colours and mixes well. The bottle of textile medium is a little more expensive, but a little goes a long, long way.
2. Do I have to use textile medium? Can't I just paint right on the fabric with the regular paint? Yes you do and no you can't. The textile medium helps the acrylic paint to sink into the fabric - keeping your Aida flexible and making it ironable/washable. Without it, the acrylic can just sit on the surface and flake and crack. That's not very nice!
Now... back to the business at hand.
Firstly, prep your work surface. We like throwing down a piece of waxed paper to work on, although any clean piece of paper would work too (don't use newspaper, the newsprint will rub off on your fabric... again, don't ask us how we know that!). Waxed paper works well because it's cheap and it doesn't absorb the paint, risking it seeping through to the surface you're trying to protect in the first place!
Cut your white Aida cloth to the size you need. For a pattern that's 5x7 we literally cut our fabric to 5x7 - that way there's no waste at all. But if you prefer to trim your fabric after you've completed stitching, that's cool too. The nice thing about painted Aida is that the edges are sealed - so they won't fray as you work!
Next, mix your paint to the colour you're trying to achieve. For softer colours it's nice to start with white paint and tint it with a little colour - in this example we're going for a soft grey. If you wanted a brighter, more vibrant colour, just go with what's in the bottle. Remember though, once you get it on the fabric, the colour always looks stronger! Trust us. When all else fails, err on the side of caution. If it's not as dark or vibrant as you wanted it to be when it's all finished, you can always repaint it.
Before you begin painting you need to mix in your textile medium. Our brand recommends a 2-1 ratio of paint to textile medium. We don't measure exactly... if you have a little too much medium that's okay. The nice thing about the textile medium is that it doesn't alter the colour of your paint!

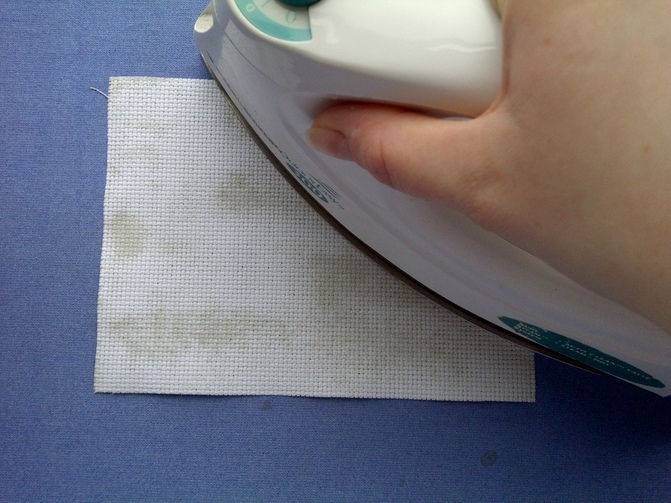
Really now all you have to do is apply your paint to your fabric - we like using a foam brush because they're really inexpensive and they achieve great coverage. You want to make sure you get every bit of your fabric painted evenly. It's going to look like the tiny holes in the Aida are all filled in with paint. Don't worry - as the paint absorbs into the fabric the holes will reopen again - and if they don't, then your needle will still go through.

You don't need a million coats of paint - truth be told, one coat usually does it. We go side to side with the first pass, and then up and down on the second to make sure no little white parts are showing through!
Now comes the hard part - waiting for the paint to dry. In the meantime don't forget to clean up! If you have leftover paint you can keep it in a sealed container to use the next time.
Once the paint has dried flip your fabric over. Don't be alarmed, but chances are a little (or a lot) of the paint has seeped through to the backside like this:

That's okay! It means the paint/textile medium has done it's job and permeated the fabric instead of just sitting on the surface. It may not look too pretty, but no one's going to see the back anyway. The last step in this process is to heat seal the paint to make it washable and permanent. We recommend a hot iron on cotton setting without steam.
We have an iron dedicated just to crafting, so we're confident to iron directly onto the backside of the fabric even though a little paint has seeped through. You can also use a pressing cloth to protect your iron if you like. Either way you're going to smell a little acrylic paint sort of smell. That's okay! Just keep your iron moving in circular motions for a few seconds to set the paint (half a minute usually does it). The textile medium we use recommends allowing 7 days for the paint to cure after you've heat set it before you wash the piece - but you can still stitch on it in the meantime!

See? Looks pretty good - unless you flipped it over, you'd never know it wasn't grey Aida cloth to begin with!! You may find that the paint has made the Aida a little stiffer. Personally, we like it that way, since it's easier to stitch on without a hoop (I generally don't use a hoop at all). But you can still hoop your fabric like normal if that's your preferred method of stitching. Once your stitching is completed, the fabric can be ironed on the backside just like normal!
And that's it! Instead of being limited to the small number of colours of Aida cloth commercially available, you can now, quite literally, make millions of colours!! With only a few basic colours of paint, you can mix an entire rainbow of personalized, one-of-a-kind colours of Aida cloth. Have fun!
I've wondered how you got those wonderful colors I haven't been able to find in the store. I love the taupe...it's a great neutral color that shows off all the thread colors, light & dark. Is that one of YOUR creations?
ReplyDelete[ ] I'm here to testify about the great work Dr Osebor did for me. I have been suffering from (HERPES) disease for the past 5 years and had constant pain, especially in my knees. During the first year,I had faith in God that i would be healed someday.This disease started circulating all over my body and i have been taking treatment from my doctor, few weeks ago I came across a testimony of one lady on the internet testifying about a Man called Dr Osebor on how he cured her from HIV Virus. And she also gave the email address of this man and advise anybody to contact Dr Osebor for help for any kind of sickness that he would be of help, so I emailed him on ( oseborwinbacktemple@gmail.com ) telling him about my (HERPES Virus) he told me not to worry that i was going to be cured!! Well i never believed it,, well after all the procedures and remedy given to me by this man few weeks later i started experiencing changes all over me as Dr Osebor assured me that i will be cured,after some time i went to my doctor to confirmed if i have be finally healed behold it was TRUE, So
Delete- [ ] friends my advise is if you have such sickness or any other at all you can contact Dr Osebor via email. { oseborwinbacktemple@gmail.com }or call or what sapp him on( +2348073245515 )
- [ ] DR osebor CAN AS WELL CURE THE FOLLOWING DISEASE:-
- [ ] HIV/AIDS
- [ ] HERPES
- [ ] CANCER
- [ ] ALS
- [ ] cancer
- [ ] Diabetes
eye problem etc.
HOW DR EDIDIA CURE MY HERPES INFECTION HIS HERBAL MEDICINE IS VERY POWERFUL TO CURE ANY DEADLY ILLNESS MORE INFORMATION WEB/SITE https://dredidiaherbalhome.wixsite.com/dredidiaherbalhome
Deletethis is unbelievable i have be suffering for Herpes Infection Dr.Edidia who helped me in my life, i want to inform the public how i was cured from Herpes Infection by Dr.Edidia,i visited different hospital but they gave me list of drugs like Famvir, Zovirax, and Valtrex which is very expensive to treat the symptoms disease and never cured me. I was browsing through the Internet searching for remedy on Herpes infection and i saw so many blogs comment of people talking about how Dr Edidia cured them.so i contacted him he gave me hope and send a Herbal medicine to me that i took and it seriously worked for me,experiencing changes all over me as the great Dr.Edidia assured me that i have been cured,after some time i went to the doctor to confirmed if i have be finally healed behold it was TRUE,my Herpes infection out negative.my prayer for Dr Edidia am cured you can also get your self and friends i will advise if you have any sickness at all you can contact now:dredidiaherbalhome@gmail.com or cell whatsapp number:+2349126592869
DeleteAm jeremiah, I am testifying about a great hebal man that cured my wife of hepatitis B and liver cirhosis. his name is Dr oniha. My wife was diagnose of hepatities two years ago, i almost spent all i had then, until i saw dr oniha recommendation online, and i call him, then he told me how to get the herb. You can call him on +2347089275769 or email him at dronihaspell@yahoo.com
I Recommend Dr easbnam to everyone for his great work for curing me from Herpes with his Herbs Remedy and today i'm cured i am happy to share the good news and to also let everyone know how great his herbs remedy is with no side effect i am free from the herpes virus with no side effects. kindly reach him out. WhatsApp + 2348106600701 Email: dreasbnamrootandherbal1@gmail.com
DeleteLiving with Herpes simplex was depression for me even with my doctor's advice and medication. My name is Vicky Moore I live in Chicago, Illinois and this is my story. I browsed the Internet in search of remedies or something but unfortunately nothing new, all still had the same results. Sadly I almost quit on myself, it was around 7:30 in the morning when my therapist called me over to her house, at first I was skeptical, but I went anyways on getting there she was smiling and said there's living proof now, she showed me a lady who also suffered from herpes simplex 3years back and now she is cured by a doctor who also studied natural herbs. I was amazed and lost for words I even doubted but showed me a doctor's report test. So I contacted the doctor and weeks later, I was cured. So I would love to use this medium to say a big thank you to my therapist and Dr. Chalopa. This story is shared to others like me out there. However, he also treats other illnesses. Email (drchalopa @ gmail. com)
DeleteAlison,
ReplyDeleteYup, it sure is!
oh that is so friggin smart! I am always looking for colored cloth, which is impossible to find around here. And I don't like ordering online because I tend to be the instant gratification type who wants to start a project the second I think about it. This is perfect!
ReplyDeleteholy cow! what a spectacular idea! i have one question though, that might be a bit foolish. you say "the fabric can be ironed on the backside" after stitching. does that mean you shouldn't iron the front side?
ReplyDeletei usually iron both sides when i'm done. which maybe isn't necessary, i dunno. i'm kinda new at it and my stitching isn't exactly neat...
Generally, it's a better idea not to iron directly on your stitches. At best you'll squish them down, at worst any gunk on the iron might come off on the stitching (aggghhh!). I usually stitch my piece, wash it (gently, in the sink, with plain hand-soap (liquid) or Ivory soap), then put it face-down on a terry towel and iron it dry. No gunk, no squishing, nice and clean and ironed flat.
ReplyDeleteThis sounds like a _wonderful_ idea. And you could even do painted backgrounds (streaks of orangy for a sunset picture? Pale blue with white dots for a snow scene?) though it would probably be hard to get any detail work in. I'm going to have to try this - I even have a big chunk of white Aida that I haven't used because white is so _boring_...
I know I'm a bit behind the times in saying this, but thank you very much for posting this tutorial! I've always wanted to try and make my own Aida colors, just because it sounded fun, but wasn't at all sure where to begin with it. This article was immensely helpful.
ReplyDeleteI want to turn my all white aida cloth to black. Would I be able to use this method?
ReplyDeleteYes, you definitely could!
DeleteGreat tutorial, thanks !! I would imagine this would also work on evenweave ?? Does the fabric need to be 100% cotton for this to work ??
ReplyDeleteI've never tried this on anything *but* cotton, but any natural fiber (like linen) should work. I'd be sure to read the instructions on the bottle of fabric medium before I started painting and do a test piece, just in case. I don't see why it wouldn't work on evenweave.
DeleteThanks, I will give it a try after the Holidays. Hope yours are happy !!
DeleteThanks for this wonderful tutorial! Now I have a question. Would it be possible to use a stamp say a snowflake and just stamp it around for a background on say a light blue aida cloth?
ReplyDeleteI don't see why not! Because of the textured weave of the aida cloth the stamp might not turn out perfectly, but I think it would be part of the charm Definitely worth giving a try!!
DeleteI love it! I was at Micheals looking for cloth and was so upset that they were sold out... I'm new to cross stitching, where do you normally get your cloth? Can't wait paint and get started!
ReplyDeleteNatalie - we usually buy our fabric online: http://www.wichelt.com/ - the folks at Wichelt are super nice and the shipping is reliable. We've also purchased from http://www.marymaxim.ca/ and http://www.herrschners.ca/dept/crossstitch+and+needlework.aspx which are Canadian sites (since that's where we are) but they also have American sites too, if that's where you are. In the UK I've heard good things about www.willowfabrics.co.uk
DeleteSometimes you can find white Aida in the most unexpected places - like Walmart!
I've been painting my own aida for more than 10 years. Yes, you can stamp on it using the foam stamps, and it turns out great. I have even made metallic colors, glittery colors, and every color under the rainbow. Have fun with it!
ReplyDeleteThis is amazing! Thanks for this tutorial. I am not itching to go to Micheal's as I love colour Aida but not the selection!
ReplyDeleteerr now*, now itching to go :)
DeleteJust to let everyone know joann fabric does sell color aida... they have this really pretty lighter blue I been wanting to.get but haven't found a pattern I like to put on it
ReplyDeleteI absolutely love this idea, but have to ask - "Will painting the cloth this way affect the color of your threads?"
ReplyDeleteNot at all :) Provided the paint is given time to dry and is heat set then it won't affect the thread colours in the least.
DeleteThank you so much! I have to restart a huge project and can not find the fabric, this is perfect!
DeleteI am so glad I found this tutorial on sprite stitch. I have a piece that needed to be half red and half green and I was not looking forward to stitching the whole background. I do have one question though, after painting and ironing it is super like unbendable stiff. Will the cloth get softer, more supple after washing it? I was hoping to use this tutorial for cloth to use on pillows or something.
ReplyDeleteHi Casey - the fabric is a little bit stiffer after it's painted but not unbendably so, and yes it does soften up a little bit further after washing. I think it would be totally fine on a pillow ;)
DeleteHow does it do with bleeding colors? I sell on Etsy and I get done with an in-depth, high end project just to wash it for framing/assembly and have to watch the reds bleed everywhere. I am extremely frustrated with that and have been working a lot of projects without the reds. But I came here to this page after searching for something that would lock the material down prior to washing, so the soak in of the bleeds won't happen in the first place. Have you experienced any noticeable difference there?
ReplyDeleteThanks!
Hi Tammie,
DeleteI have had red Aida cloth (commercially bought) bleed before, which is one of the reasons why I started painting my own! Such a heartbreak when that happens. I've never had Aida I painted myself bleed in any way - if you follow the instructions for the fabric medium (amounts and ironing time, etc) it will be completely colour-fast. The fabric medium we use does recommend waiting a certain amount of time for the paint to 'cure' before washing -- and you need to heat-set the paint too as per the instructions. I always wash my stitching in lukewarm water, not blazingly hot and of course I only ever let it air-dry.
If it's the red colour from your embroidery floss which is the culprit then I highly, highly suggest changing to a different brand of floss. We only use DMC floss, which is very good quality and has NEVER bled on me - ever - in twenty+ years of using it.
Good luck!!
I've a question. Does the sizing need to be washed out before painting the Aida fabric? The Delta textile medium says to pre-wash fabric to remove the sizing, but in your tutorial it looks like the painting is done on the Aida as-is.
ReplyDeleteI've never bothered to wash the sizing out -- that's really only a concern for fabric which might shrink and be laundered repeatedly. As there's very little chance you'll be washing your stitching as often as you would a t-shirt, I don't think it's a concern. I've never had a problem with the Delta textile medium on unwashed Aida
DeleteI've got an unusual question. My mom made a beautiful cross stitched angel with heaving beading. The design is solid stitching and beading. She put this on a sky blue aida cloth which matches nothing in my home. Is it possible to paint the aida cloth as you've described above after the piece is completed.
ReplyDeleteYou could... But it would be darn tricky trying to paint up against the stitching without getting any paint on the floss. Also, I'd be leery to iron anything with beads on it at the temperature you'd need to use to set the paint, which us pretty hot.
DeleteFirst, thanks for posting this info!!
ReplyDeleteHopefully you haven't already answered this question.
Can you paint both sides?
I want to do a cross stitch pattern on a dark red Aida cloth and to have one side (possibly) blotchy red/white would bother me.
Thanks!!
You definitely could paint both sides. I'd just wait until the first side was dry before painting the second, and I would use a pressing cloth when ready to iron.
DeleteTried this technique this afternoon and just have one problem. It is dry now and all 4 pieces that I did seem to have some areas where the holes are filled in. Should this have happened? I used 11 ct. instead of 14, but didn't think that should make a difference. ??? Thanks.
ReplyDeleteOkay, I think I discovered my problem (from above comment). I reread your whole post and realized I had used tube paint not bottle. I did that because it was the color I wanted and didn't think it would really matter. Anyhow, I just did one with bottled paint and it does look better. My mistake before, I guess. :)
ReplyDeletehave you tried this painting method on other than aida...e.g. linen and even weaves?
ReplyDeleteHave you tried painting colored aida at all? I ordered a natural color aida that appeared much darker online than it is in real life, and I prefer the darker color for the project I plan to use it for. Do you think the natural aida could be painted to darken it up a bit?
ReplyDeleteI just saw this post for the first time today.I've been painting on fabrics of all sorts for years,sometimes I used textile medium and other times I used water,both worked and as long as they were heat set,they never bled or washed out.
ReplyDeleteI was into the wearable arts for years when my kids and grand kids were small,i also was/am (although not too much anymore) a tole painter,quilter,seamstress etc.So I've painted on lots of stuff over the years.
So having done all that,let me say use the ceramcoat paints ! Do NOT use Apple barrel brand as it doesn't have enough pigment in it,and your results won't be as good.
When I mix the paint with water,i do wet the fabric first,you can do this by spraying or just dipping it in water,do not wring out,blot with a towel if too wet.This helps the paint stick/absorb into the fabric.If using textile medium,you can skip that part.
Just remember whatever method you do the trick to having it not fade or wash out is in the ironing,and heat setting it.Have fun,and remember you're limited only by your imagination!!!
You say that you've used water - I'd be curious to know an estimate of the ratios you use. I've not had any luck finding textile medium in any of the stores around me. Do you just paint onto wet fabric or do you mix the paint with water first?
DeleteHello Roxy. I saw your 2012 comment about Aida painting. If you are still doing this may I ask you if I can paint after I finished the project.. Thanks Alfred
DeleteHi there! I was wondering, since the paint makes the cloth a bit stiffer, does this affect when you go to put it into an embroidery ring? I'm wondering if the paint "'chips" or "cracks" when doing so?
DeleteThis comment has been removed by the author.
ReplyDeleteNice ideas.i like it.we have to make our designs with favorites color combination.
ReplyDeleteI just love this idea and am thinking about all the things I could recycle using this technique. haberdashery
ReplyDeleteThis comment has been removed by a blog administrator.
ReplyDeleteI just found these GREAT little 6x6 pieces of aida stretch on a little wooden frame at Michaels (while visiting family in MD) and I immediately thought, "how can I make them NOT stark white aida"! How excited am I to find this tutorial!! LOVE IT! And, I will be back to buy your wee stitches of Star Wars characters to do for a teacher gift for the next school year for gift for male teacher our daughter will have!! Cannot wait! Thanks for sharing!!
ReplyDeleteThis. Is. Amazing.
ReplyDeleteSO glad I found this! Will definitely have to try. I used to be able to find all kinds of beautifully colored Aida cloth, but I think cross stitching has gone out to some degree, because it's difficult to find much of anything anymore.
Thank you so much for this post! :)
I wanted to by orange for halloween Get this... Joanns wanted 30.00! I bought a 5.00 bottle of orange Rit. Job done. I will remember ur way next time DEFINETLY!
ReplyDeletecan you wash your completed x stitch project ? I usually just wash in the sink with a mild dish soap, and lay flat to dry
ReplyDeleteHi,
DeleteIf you've used the fabric medium and heat set the paint as per the instructions, then yes you can launder it. All the brands of textile medium I've used recommend an amount of time to let the paint cure before you launder it (usually 72 hours or so) but you can still stitch on it in the meantime.
No. Maybe on gentle but wouldn't even trust that. IMO. I would continue washing in sink with mild soap, drying flat or iron dry
ReplyDeleteGood luck
No. Maybe on gentle but wouldn't even trust that. IMO. I would continue washing in sink with mild soap, drying flat or iron dry
ReplyDeleteGood luck
Terrific technique! Instead of cross stitching, can you paint (with acrylic) on the aida cloth to look like cross stitch? As in squaring off the corners?
ReplyDeleteWould this technique work on regular cotton fabric to paint on? Or embroider/cross stitch on?
After painting the first coat would you recommend using a hair dryer to speed up the drying process so you can paint the second coat? Thank you! RosieRose
Hi!
ReplyDeleteYou totally could paint the stitches on the fabric instead of stitching them - it would be time-consuming, but could be really cute. There are several tutorials floating around for painting faux cross-stitching on walls, so a similar method could definitely be applied to fabric.
Yes, you can paint any cotton fabric. I've used fabric medium to stamp on t-shirts and pillow cases with great success. Just remember that the paint/fabric medium combo does make the fabric a bit stiffer, so I wouldn't want to do huge swathes of fabric which might be worn.
I never have to do a second coat the way I paint my aida, so I don't know exactly how well that would work, but I don't see why a blow-dryer wouldn't speed things up. The heat from the blow-dryer may set the paint a little though, so you wouldn't be able to launder out any mistakes that you've made.
Thanks! Definitly going to try this! Rosie
ReplyDeleteThank you
ReplyDeleteThis just may solve my issue for an upcoming project so I don't have to stich the dark brown background on 22 count!!
ReplyDeleteI was wondering if you have ever tried to paint the aida with glow in the dark paint? Thinking I just may have to try that.
ReplyDeleteI am so glad I found this post on Pinterest! It never even occurred to me to paint the aida cloth. I usually stitch on 16 or 18 count and they seem to have even fewer color choices then the 14. Now back to the top of the page to sign up for your newsletter.
ReplyDeleteI use a frame with the ends rolled onto the dowels. Will painted fabric hold up to being tightly rolled?
ReplyDeleteTruthfully, I've never tried it, but if you properly heat set the paint as per the manufacturers instructions, it should. I usually hold the fabric in my bare hands while I stitch, although I do sometimes use a hoop, and I've never had a problem with the paint cracking or rubbing off and I don't think the frames with the rolling dowels would put any more stress on the piece than a wooden embroidery hoop would - probably less in fact!
DeleteThis comment has been removed by a blog administrator.
ReplyDeleteI don't have the fabric medium. Can I just use fabric paint I have sitting around?
ReplyDeleteI am here to give my testimony about Dr Ebhota who helped me.. i want to inform the public how i was cured from (HERPES SIMPLEX VIRUS) by salami, i visited different hospital but they gave me list of drugs like Famvir, Zovirax, and Valtrex which is very expensive to treat the symptoms and never cured me. I was browsing through the Internet searching for remedy on HERPES and i saw comment of people talking about how Dr Ehbota cured them. when i contacted him he gave me hope and send a Herbal medicine to me that i took for just 2 weeks and it seriously worked for me, my HERPES result came out negative. I am so happy as i am sharing this testimony. My advice to you all who thinks that there is no cure for herpes that is Not true just contact him and get cure from Dr Ebhota healing herbal cure of all kinds of sickness you may have like
ReplyDelete(1) CANCER,
(2) DIABETES,
(3) HIV&AIDS,
(4) URINARY TRACT INFECTION,
(5) CANCER,
(6) IMPOTENCE,
(7) BARENESS/INFERTILITY
(8) DIARRHEA
(9) ASTHMA
(10)SIMPLEX HERPES AND GENITAL
(11)COLD SORE
HERPES. he also cure my friend from cervical cancer Email: drebhotasoultion@gmail.com or whatsapp him on +2348089535482
Herpes is a serious and recurring disease which can't be cured through drugs or injections by the doctors but the best way to deal with Herpes is by taking natural herbs medicine for it, I have read about DR NOGADU the great herbalist doctor who cure me from herpes with his powerful herbal medicine. i contacted him to know how he can help me and he told me never to worry that he will help me with the natural herbs from God! After 2 days of contacting him, he told me that the cure has been ready and he sent it to me via UPS SPEED POST and it got to me after 3 days! i used the medicine as he instructed me (MORNING and EVENING) and i was cured! It was really like a dream but i was so happy! you should contact him for his herbal medicine because i am a living testimony and i was cured of herpes and his medicine is legit. I sent him what he requested and he sent me his medicine which I took for 2 good weeks and today I am out here with a negative result. When I went for the test I was so happy after going through his medication. you can reach him through his email: drnogaduherbalist@gmail.com or call/whatsapp number:+2347010627760 he will help you out.
ReplyDeleteI wonder if you could paint the background around stitching you’ve already done, without it affecting the stitches? 🤔
ReplyDeleteMy health was horrible before I decided to try the Protocol Of taking Dr. Omola pure herbal mixture. I felt there was no hope for my health and I was to try the Protocol, thinking it wouldn’t work because I have visited so many hospital but same result. However, I was convinced by a Instagram friend to try the herbal medicine because I wanted to get rid of Herpes virus. The herbal mixture that was given to me was really quick and easy to take, within 2 week i was fully cured from Herpes. The herbal medicine really work and I will like to share this great doctor contact with you all email him dr.omolaherbalhome@gmail.com or WhatsApp +2348118116254 you won't regret it.
ReplyDeleteI’m here to testify about what Dr. Omola did for me. I have been suffering from (GENITAL HERPES VIRUS) disease for the past 3 years and had constant pain and inching, especially in my private part. During the first year, I had faith in God that i would be cured someday.This disease started circulating all over my body and I have been taking treatment from my doctor, few weeks ago I came across a testimony of Mary on the internet testifying about a Man called Dr. Omola on how he cured her from 5 years HSV 2. And she also gave the email address of this man, advise anybody to contact him for help on any kind of diseases that he would be of help, so I emailed him telling him about my (HSV 2) he told me not to worry that I was going to be cured!! Well, I never doubted him I have faith he can cure me too,, Dr. Omola prepared and sent me Healing Oil, Soap, roots and herbs which I took. In the first one week, I started experiencing changes all over me, after four weeks of using his Roots/ Herbs, Oil and Soap, I was totally cured. no more inching , pain on me anymore as Dr. Omola assured me. After some time I went to my doctor to do another test behold the result came out negative. So friends my advise is if you have such disease or know anyone who suffers from it or any other disease like HPV, HBV, HIV, ALS, HBP, CANCER etc. you can contact Dr. Omola for help via dr.omolaherbalhome@gmail.com or whatsapp +2348118116254.
ReplyDeleteA GREAT THANKS TO DR.WEALTHY FOR CURING ME FROM GENITAL HERPES I AM SO HAPPY TO GIVE THIS TESTIMONY ARE YOU SUFFERING FROM THIS SICKNESS HERE IS DR WHO CAN HELP
ReplyDeleteI can’t believe my genital herpes is really cured, oh is by this time last year I start feeling bad about my life, I feel pain everyday of my life am very happy now that am really cured I couldn’t have do this on my own I wish is not God that help me with my helper I was searching the internet about this sickness last 3month when I found about great doctor wealthy, the man that keep his words I write the man email about my problem immediately I get a reply from him asking me to fill a form which I immediately did and send back to him after some mins he reply me that he have work on my cure that I need to provide some materials, which can enable him to work on my cure which I did on the next day of it, after some hours he inform me that he have getting the things needed for the cure and he is about to go on with the curing spell he called me again after 50mins that he is done with the cure that I should check my body and also go for test I cant believe I was negative a big thanks to him am very happy now with my family you can also get your self cured too from this sickness by contacting him through his email: wealthylovespell@gmail.com or whatapp +2348105150446 follow his instagram @wealthylovespell1 He also have a herbal cure for 7 other DISEASES;
1.HIV
2.SHINGLES
3.VIRAL HEPATITIS
4.INFLUENZA
5.IMPOTENCE,
6.BARENESS/INFERTILITY,
7.ANTHRAX
8 HPV
Contact him today and you will have a testimony…Good luck!
ReplyDeleteI am so Happy to be writing this article in here, i am here to explore blogs forum about the wonderful and most safe cure for HERPES SIMPLEX VIRUS.I was positive to the Virus called HERPES and i lost hope completely because i was rejected even by my closet friends. i searched online to know and inquire about cure for HERPES and i saw testimony about DR Ebhota online on how he cured so many persons from Herpes Disease so i decided to contact the great herbalist because i know that nature has the power to heal everything. i contacted him to know how he can help me and he told me never to worry that he will help me with the natural herbs from God! after 2 days of contacting him, he told me that the cure has been ready and he sent it to me via FEDEX or DHL and it got to me after 4 days! i used the medicine as he instructed me (MORNING and EVENING) and i was cured! its really like a dream but i'm so happy! that's the reason i decided to also add more comment of Him so that more people can be saved just like me! and if you need his help,contact his Email: (drebhotasoltion@gmail.com) You can contact him on WhatsApp +2348089535482 He also have the herb to cure difference cure for any sickness (1) HERPES,
(2) DIABETES,
(3) HIV&AIDS,
(4) URINARY TRACT INFECTION,
(5) HEPATITIS B,
(6) IMPOTENCE,
(7) BARENESS/INFERTILITY
(8) DIARRHEA
(9) ASTHMA..
ReplyDeleteGreetings to the general public, i want to inform the public how i was cured of HERPES Simplex Virus by a Doctor called Dr. Omola i visited different hospital but they gave me list of drugs like Famvir, Zovirax, and Valtrex whicmptoms and never cured me. I was browsing through the Internet searching for remedy on HERPES and i saw comment of people talking about how Dr. Omola cured them. when i contacted him he gave me hope and send a Herbal medicine to me that i took and it seriously worked for me, i am a free person now without problem, my HERPES result came out negative. I pray for you Dr. Omola God will give you everlasting life, you shall not die before your time for being a sincere and great man. Am so happy, you can also contact him if you have any problem, Email Address dr.omolaherbalhome@gmail.com or whatsapp or call him +2348118116254. thank me later.
Am here to let the whole world know that I was diagnose of herpes 3 years ago where all hope was lost and I had nothing to do about it,I just accepted the faith that one day I will cure of this disease and I just pray everyday for a helper and one day my sister introduce me to a herbal doctor man called Dr Aire that she saw him on internet well I contact him on his email,I was not fully convinced until he sent me the herbal medicine which he ask me to take for two weeks I took it with faith and i went for a retest in different hospitals and today am cured of this disease and am also using this medium to let all those having STD,like herpes and the rest not to give up,their is a man who can cure you,his name is Dr Aire . contact the great herbalist via his email; (drairehome@gmail.com) or /WhatsApp +2347036740271 ..............
ReplyDeleteThere is a safe & effective Natural Herbal Medicine. For Total Cure Call +2348025012866, or email him drrealakhigbe@gmail.com For an Appointment with (Dr.) AKHIGBE contact him. Treatment with Natural Herbal Cure. For:Dengue Fever, Malaria. Painful or Irregular Menstruation. HIV/Aids. Diabetics. Vaginal Infections. Vaginal Discharge. Itching Of the Private Part. Breast Infection. Discharge from Breast. Breast Pain & Itching. Lower Abdominal Pain. No Periods or Periods Suddenly Stop. Women Sexual Problems. High Blood Pressure Chronic Disease. Pain during Sex inside the Pelvis. Pain during Urination. Pelvic Inflammatory Disease, (PID). Dripping Of Sperm from the Vagina As Well As for Low sperm count. Parkinson disease. Obesity, Lupus. Soreness/Injury Cancer. Tuberculosis. Zero sperm count. Bacteria, Impotence Fertility,Protoplasmic, Diarrhea. Hepatitis A&B, Rabies. Asthma. Quick Ejaculation. Gallstone, Cystic Fibrosis, Schizophrenia, Crubs, Cirrhosis, Premature Ejaculation. Herpes. Joint Pain. Stroke. Cornelia Disease, Weak Erection. Ovarian problem, HeartBurn, Erysipelas, Thyroid, Relapsing polychondritis, Discharge from Penis. Bronchial Problem, HPV. Hepatitis A and B. STD. Smallpox, Staphylococcus + Gonorrhea + Syphilis. Heart Disease. Pile-Hemorrhoid.rheumatism, Impotence, thyroid, Autism, Depression, Sepsis Bacteria, Penis enlargement, Prostate Problem, Waist & Back Pain. Male Infertility and Female Infertility. Etc. Take Action Now. contact him & Order for your Natural Herbal Medicine: +2348025012866 and email him drrealakhigbe@gmail.com Note For an Appointment with (Dr.) AKHIGBE.I suffered in Cancer for a year and three months dying in pain and full of heartbreak. One day I was searching through the internet and I came across a testimony of herpes cure by doctor Akhigbe. So I contacted him to try my luck, we talked and he sent me the medicine through courier service and with instructions on how to be drinking it.To my greatest surprise drinking the herbal medicine within three weeks I got the changes and I was cured totally. I don't really know how it happens but there is power in Dr Akhigbe herbal medicine. He is a good herbalist doctor.
ReplyDeleteMy health was horrible before I decided to try the Protocol Of taking Dr. Omola pure herbal mixture. I felt there was no hope for my health and I was to try the Protocol, thinking it wouldn’t work because I have visited so many hospital but same result. However, I was convinced by a Instagram friend to try the herbal medicine because I wanted to get rid of Herpes virus. The herbal mixture that was given to me was really quick and easy to take, within 2 week I was fully cured from Herpes. The herbal medicine really work and I will like to share this great doctor contact with you all email him dr.omolaherbalhome@gmail.com or WhatsApp +2348118116254 you won't regret it, I promise.
ReplyDeleteDr. Riaria cured my herpes virus that have been in my body since two years, ever since then my life has been incomplete, I have used so many drugs that was prescribed to me by doctors, but it didn't cure my herpes virus, i was checking for solution on the internet then I miraculously came across Dr. Riaria the powerful herbalist that can cure herpes infection, then I contacted him through his email, I explained everything to him and he prepared a herbal medicine and sent it to me through FedEx, which I took for 14 days with the instruction he gave me, and when I did a test in the hospital my result came out negative it was the happiest day of my life that am cure from HSV 2, are you also suffering from same virus or another diseases you can simply contact him via email: drriaria@gmail.com you can also call or WhatsApp him on: +2349134987375.
ReplyDeleteAll thanks to Dr Alli for curing my herpes virus/hpv with his herbal medicine, i do not have much to say but with all my life i will forever be grateful to him and God Almighty for using Dr Alli to reach me when i thought it was all over, today i am happy with my life again after the medical doctor have confirmed my HERPES SIMPLEX VIRUS / HPV of 5 is gone,i have never in my life believed that HERPES SIMPLEX VIRUS could be cured by herbal medicine. so i want to use this means to reach other persons who have this disease by testifying the power of Dr Alli that all hope is not lost yet, try and contact him by any means for any kind of disease with his email: ( Allispellhelp1@gmail.com ) or his whatsapp number +2348100772528 and get your healing
ReplyDeletefew week ago I felt some pains and I went to the hospital my doc told me I had Herpes about 1 year ago and I need to start the treatment early, he gave me some medicine to be taking and I told him no I’ll not, because I hated taking medicine when I won’t not see cure for the purpose. After I got home I started getting worried searching for strong advice and I found valid natural treatment online a lot of people says they got herpes cure from DR.IMOUDU and I contacted DR.IMOUDU that same day I purchase his cure online, after two weeks of taking the herbel treatment i got cured totally. i tested negative all thank to DR.IMOUDU you can also reach him on his email: [DR.IMOUDUHEALERTEMPLE@GMAIL.COM ] or message him on WhatsApp +2348109609753 God bless you
ReplyDeleteI Want To Appreciate Dr.godwin for hs great deeds, I Was Diagnosed With type 2 Herpes Virus Last year,And Was Look For Solution To Be Cured Luckily I Saw Testimonies On How Dr.godwin Cure Herpes Virus I Decided To Contact Dr.godwin I Contacted Him He Prepared A Herbal Medicine Portion And Sent It To Me,I Started The Herbal Medicine For My Health.He Gave Me Step By Step Instructions On How To Apply It, When I Applied It As Instructed, I Was Cured Of This Deadly Herpes Within 2 weeks, I Am Now Herpes Negative.My Brother And Sister I No That There Are So Many People That Have There Same Herpes Virus Please contact Dr Goodwin To Help You Too,And Help Me To Thank Dr. GODWIN For Cure Me, I’m Cured By Dr. Godwin Herbal Medicine,His Contact Email: drgodwinsolutionhome@gmail.com
ReplyDeleteOr Cell Whatsapp Number +2348054615060 thank you ....
I want to share my testimonies to the general
ReplyDeletepublic on how this great man called Dr OLOKUN who cure my herpes. I have been a HERPES patient for over 9 Months and i have been in pains until i came across this lady when i traveled to Africa for business trip who happer and she told me that there is this great herbal doctor that help her tocure her herpes and she gave me his email address for me to contact and i did as she instructed. The man Dr OLOKUN told me how much to buy the
herpes herbal medication and how i will get it, which i did. And to my
greatest surprise that i took the Herpes herbal medicine for just two week as he
instructed and behold i went for a herpes test, to my greatest surprise for the
doctor confirmed me to be herpes free and said that i no longer have
herpes in my system and till now i have never felt any pains nor herpes again, so i
said i must testify the goodness of this man to the general public. So if
you are there surfing from this Herpes problems or any deadly disease or
other disease for i will advice you to contact him on his working
email: drolokuntemple@gmail.com OR on his cell phone +2348132537313 whatsapp number
+2348132537313
The United States government spends $158 million dollars a year towards research in finding a cure for infection & diseases like tremor, anxiety&depression, psoriasis, shingles, eczema, urethra wart, chronic problems. Herpes, Cancer, Als,Hepatitis, Diabetes, HPV,Infections,ulcer,respiratory obstruction ETCThey don’t want a cure because there’s no profit in it for them and the pharmaceutical industry let truth be told please, that's more reason why I venture into herbal treatment, and i was able to cure my self from diseases that they said it incurable medically .Sometimes you don't always have to give up in everything you do and letting someone else decide your fate .Dr ehiaguna herbs are very essential and it has the potentials to cure the so called incurable.His contacts are always active check out his email to order your medicine via drehiaguna@gmail.com or whatapp : +2348073908953 This medicine has NO SIDE EFFECT, there's no special diet when taking the medicine.
ReplyDeleteI was depressed when the doctor told me that I have been diagnosed with Herpes disease… I thought about my Family, I know my Family will face a serious problem when I'm gone, I lost hope and I wept all day, but one day I was searching the internet and I found Dr.obudu' contact number. +2349023428871 I called him and he guided me. I asked him for solutions and he started the remedies for my health. Thank God, now everything is fine, I'm cured by Dr.obudu herbal medicine, I'm very thankful to Dr.obudu and very happy with my hubby and family. email him on drobuduherbalhome@gmail.com or you can also reach him through WhatsApp number+2349023428871 also visit hes websitehttps://drobuduherbalhome.wixsite.com/welcometoobuduherbal or visit his facebook page https://www.facebook.com/DR-OBUDU-101779795066025/
ReplyDeleteHe can also cure so many sickness
{1}HIV And AIDS
{2}Diabetes
{3}Epilepsy
{4}Blood Cancer
{5}HPV
{7}ALS
{8}Hepatitis ,.,.,.
I still cant believe that my herpes is gone after two years of suffering. Thanks to Dr Momoh who cured my herpes with his herbal medication I never thought I will ever be heal again, I was a herpes positive two years ago and I have try so many medication so I can be free of this dearly disease but nothing work out, so one day I go on a research on the internet where I saw someone given testimony on how Dr Momoh help him to cure his herpes virus with his herbal medication, so I said to myself it also the same problem am having so I have to also contact the herbal doctor Dr Momoh on his email which the man recommended to anyone who might also need his help, Wholeheartedly am so grateful to this man as he help me with the cure and make me a happy man again. Anyone out there who might be facing same problem should kindly contact Dr Momoh as is know he will help you with all your problems, contact him through his email dr.momoh9@gmail.com, call or WhatsApp him +2347083724098
ReplyDeleteI’m 61 years old. I contracted hpv in 2011′ I has be taking lot treatment for it and embarrassed some months ago the wart stated coming out seriously, I used lot recommendation because there was lot warts around my anus and was so . but today I’m totally happy I got the virus eliminated by using natural treatment from Dr Onokun herbal center after his treatment I got cured. all the warts went away’ seriously believed Dr. Onokun he have the cure for human papillomavirus because he has eliminated hpv been in my body since 2011, Dr. Onokun make it possible for me. Here is Dr. Onokun email: Dronokunherbalcure@gmail.com or page at: https://www.facebook.com/naturaltreatmentcenter1 or WhatsApp him via +1 ( 323 ) 689 3594 and Website: http://Dronokunherbalcure.wordpress.com he is welled capable of curing terrible diseases.
ReplyDeletei am so glad to write this article today to tell the world how Dr. Ohunyom cured my HPV virus that have been in my body since five years ago, ever since then my life has been in complete,i have used so many drugs that was prescribed to me by several doctors,but it didn't cure my HPV VIRUS neither did it reduce the pain, i was checking for solution on the internet then miraculously came across Dr. Ohunyom the powerful herbalist that cure HPV INFECTION,then i contacted his email, i explained everything to him and he prepared a herbal cure and send it to me that was how i got cured from HPV disease totally after receiving his herbal medicine, so my friends viewers why waiting and be suffering with this HPV virus when there is someone like Dr. Ohunyom that can get you cured completely. you can contact his Email via:drohunyom@gmail.com and also WhatsApp him +2349060579973 And He also have herbs medicine to cured the following diseases; eczema,urethra wart,chronic problems.Herpes, Cancer, Als,Hepatitis, Diabetes, HPV,Infections,ulcer ETC
ReplyDeleteI'm recommending Dr Okuofoh to everyone who has the herpes simplex virus to get the cure from him. I was diagnosed with genital herpes in 2020 and I have been searching and asking questions to see if I could get something to cure the disease because I did not believe what the doctors say that no cure is found yet. I came across a comment on Youtube and the person testify how she was cured of herpes after using Dr Okuofoh herbal medicine. I quickly contact Dr Okuofoh and explain my problem to him and he prepares the herbs and send it to me through UPS and gave me instructions on how to use it and tell me to go for a checkup after usage which I did after two weeks of taken the herbal medicine and my result was NEGATIVE. I waited another month and retested the result was still NEGATIVE and my doctor told me that am completely free from herpes. Am so happy and grateful to Dr Okuofoh for what he has done for me and I will continue to share this with people out there to know that there is a herpes cure can contact Dr Okuofoh by email and WhatsApp to get the cure from him. Email: drokuofohherbalhomehealing@gmail.com
ReplyDeleteCall or WhatsApp +2349050141449.
Hello everyone, I want to say a special thanks to Dr. Okuofoh for helping me get cured of herpes virus type 1, I contacted his base on the testimonies I saw about him on the internet. I was diagnosed with HERPES Virus and I tried all I can to get cured but all to no avail, until I saw a post in a health forum about a herbal man who prepare herbal medicine to cure all kinds of diseases including HERPES virus and Diabetes, at first I doubted if it was real but decided to give it a try, and true that I was cured by the herbal medicine he sent to me, and my Doctor has delivered my results to me and it shows that I don't have herpes again and that is why I am happy today and also share the good news to everybody to hear about the healing, contact Dr. Okuofoh if you need a herbal cure to cure herpes and Diabetes, his email at: drokuofohherbalhomehealing@gmail.com or text him on Whatsapp /call: +2349050141449. Thank you, sir.
ReplyDelete
ReplyDeleteI'm Maria Lopez from Texas USA, I never believe i can get cured of hepatitis B, i was fully taught about this disease by my medical DR that there is no cure of this chronic disease, but was so surprise about this herbal medicine just get my hepatitis B negative, am still very confuse if it is the hand work of this herbal medicine or miracle, I so much appreciate you Dr Irene for God using you to cure me, please anyone out there who is suffering for this disease should contact this herbal medicine man for help. the email is drireneherbalcure@gmail.com
When I was living with the virus HSV, I thought I was doomed, as so many people forced me to believe there is no cure idea but that changed the moment I contacted dr.enatoherbalcure@gmail.com, My hope was brought back alive by the comforting words of the doc, Dr. Enato placed me on a three weeks natural herbal medication body flush and at the end of it my subsequent test result came out Negative and I now have a normal life free from disease, say no to HERPES, visit dr.enatoherbalcure@gmail.com Today for help. say a big NO to diseases. For fast communication whatsApp contact +2348071351544 or his website https://drenatoherbalcure.simdif.com
ReplyDeleteHello everyone I am Gerraca mattews by name, there is a herbal doctor who can help you get rid of your Herpes disease permanently. He also helps me get rid of mine. I really appreciate him for saving my life. You can contact the herbal doctor for help, here is email (Drakhigbeherbalhome5@gmail.com ) or WhatsApp +2349021374574, I wish you good health.
ReplyDeleteIt's fascinating to see how you integrate these two creative forms, providing readers with a multi-sensory experience.
ReplyDeletehttps://promocodehq.com/all-stores
Cured from (HSV)-2, via__________________________ R.buckler11@gm a i l. com],…
ReplyDelete🙂 ~ Blessings!
HE CURES ALL.............
HERPES 1&2
HEPATITIS
FIBROID
PROSTATE CANCER
ERECTILE DYSFUNCTION
Appreciate your work!!
ReplyDeleteI Recommend Dr easbnam to everyone for his great work for curing me from Herpes with his Herbs Remedy and today i'm cured i am happy to share the good news and to also let everyone know how great his herbs remedy is with no side effect i am free from the herpes virus with no side effects. kindly reach him out. WhatsApp + 2348106600701 Email: dreasbnamrootandherbal1@gmail.com
ReplyDeleteVery Good online digitizer nice
ReplyDeleteFind a natural alternative method to reverse different diseases and STDs no matter what hospital’s says about these illness. I am sharing my healing encounter from genital herpes after using DR ONOBUN HERBAL PRODUCTS to cure my HSV-1&2 diagnosis permanently. A few weeks ago my new lab result shows that I tested negative. I am so happy I did give it a try. Currently, my 65 years old mom is using " herbs" to eliminate her diabetes and the recovery process is amazing. I am recommending this product for those that are willing to give it a try as these holistic remedies do not have any side effects. It’s also crucial to learn as much as you can about your diagnosis. Seek options check out: (dronobunspiritualhome@gmail.com or directly on his WhatsApp contact +2348051300199 )
ReplyDeleteI have human papilloma virus
ReplyDelete(HPV) 4 years ago and i meant a doctor he told me there is no cure and i hI explained what I was passing through, he gave me hope and assured me that I will be cured and saved from my genital herpes without any after effects. He sent me some herbs and guided me on how to use them. I used the herbs constantly for 2 weeks plus some days. I went for test and the herpes result was negative. The blisters on my vagina disappeared and completely healed. 'Am so happy because God used DR JACOB to turn my herpes lesson into blessings. You can contact DR JACOB through his Email: you can thank me laterave be taking some medication the warts multiplied when trying to removed them and it got me embarrass and pains, luckily few weeks ago i was recommend to DR JACOB for natural treatment after some weeks i got 100% cure and all the wart and pains got disappeared, i sheared this post because its part of my life experience, encase anyone need speedy help about this cure, * He also cured different kinds of illness... *HERPES *Gout *Diabetic
* Hepatitis *Lupus *Asthma *Ulcers *Unblock fellopian tube *HIV AIDS *Ringing ears
* Pregnancy *eczema. DM :drjacobherbalhome2@gmail.com WhatsAPP +1 (336) 962-8303
I’ve heard plenty about spells but have never attempted it and the one time I did, it was successful for me. LORD MEDUZA performed a spell for me and provided the winning number that allowed my husband and I to win the Lotto. I returned home from the hospital where my baby was born and asked my husband to buy a Lotto Max ticket after seeing on social media that the Jackpot was at $70 million, mentioning that I’d found someone who could assist us in winning it and we proceeded exactly as LORD MEDUZA directed with the ticket. The next morning, I used my phone to check the ticket and heard a winning tone. I was in disbelief and unable to comprehend what was occurring, I looked at the ticket once more and I saw the same thing. That’s when I phoned my husband to tell him we had won. Thus, anyone seeking assistance can reach out to LORD MEDUZA, as his work embodies what I term perfection. He can be contacted via
ReplyDeleteWHATSAPP: +1 807 907 2687
EMAIL: lordmeduzatemple@hotmail.com
I want to share a testimony, how i was cured from Herpes by DR JACOB with his herbal remedy. I don't know where to start, I'm 33 years old and i was diagnoses of genital herpes diseases for 5 years. i lost all hope in life but on like any other i still searched for a cure even on the internet and i saw a comment were a lady testify how she was cured by DR JACOB i could not believe it at first, i contacted him, He sent me his herbal remedy i used it for 2 weeks and the Herpes virus was cured completely. I went for medical check and the result was negative from Herpes.
ReplyDeleteFor those who have the same problem, or any STD should contact Dr JACOB via email:www drjacobherbal.online WhatsAPP +1 (336) 962-8303
A GREAT THANKS TO DR.JACOB FOR CURING ME FROM GENITAL HERPES I AM SO HAPPY TO GIVE THIS TESTIMONY ARE YOU SUFFERING FROM THIS SICKNESS HERE IS DR WHO CAN HELP
ReplyDeleteI can’t believe my genital herpes is really cured, oh is by this time last year I start feeling bad about my life, I feel pain everyday of my life am very happy now that am really cured I couldn’t have do this on my own I wish is not God that help me with my helper I was searching the internet about this sickness last 3month when I found about great doctor wealthy, the man that keep his words I write the man email about my problem immediately I get a reply from him asking me to fill a form which I immediately did and send back to him after some mins he reply me that he have work on my cure that I need to provide some materials, which can enable him to work on my cure which I did on the next day of it, after some hours he inform me that he have getting the things needed for the cure and he is about to go on with the curing spell he called me again after 50mins that he is done with the cure that I should check my body and also go for test I cant believe I was negative a big thanks to him am very happy now with my family you can also get your self cured too from this sickness by contacting him through his email: drjacobherbalhome2@gmail.com WhatsAPP +1 (336) 962-8303 He also have a herbal cure for 7 other DISEASES;
1.HIV
2.SHINGLES
3.VIRAL HEPATITIS
4.INFLUENZA
5.IMPOTENCE,
6.BARENESS/INFERTILITY,
7.ANTHRAX
8 HPV
Contact him today and you will have a testimony…Good luck!
I was diagnosed with human papilloma virus (HPV) 4 years ago and i met a doctor he told me there is no cure and i have be taking some medication the warts multiplied when trying to removed them and it got me embarrass and pains, luckily few weeks ago i was recommend to Dr Ogedegbe for natural treatment after one week i got 100% cure and all the wart and pains got disappeared, i shared this post because its part of my life experience, incase anyone need speedy help about this cure email Dr Ogedegbe via dr.ogedegbe6@gmail.com or Whatsapp him now on + 2349121737553
ReplyDeleteNature is indeed a blessing to man kind I was suffering from COPD and Chronic pain, My Life was like a living hell for me, not until I came across Doctor
ReplyDeleteJACOB , I was free completely from these illnesses, He is a God sent, I sincerely want to Thank you for your wonderful treatment and kind gesture. You have always made sure I was doing okay, I can never thank you enough for all your services. You are truly a man of honor and word. I will always pray to God for your betterment. I suggest you try him out if you are having any health challenges and also be cured too, give him a try. www drjacobherbal . online WhatsAPP+13369628303
My husband had MND Chronic Disease , first symptom was weakness in his fingers, one day, we had a dream life with early retirement and then, when we went to find out about the weakness, our whole world almost changed. There are so many things that can be said abt the suffering and frustration of people with Chronic Disease , we look back now and realize in many ways how lucky we were to found DR JACOB herbal cure that was able to get rid of my husband Chronic disease totally, we had time to enjoy life and above all we all had time to also share this great testimony , many people lose loved ones without closure. I can’t imagine going thru all that you or your family had to live with daily, do not hesitate to contact drjacobherbalhome2@gmail.com WhatsAPP +1 (336) 962-8303
ReplyDeleteTourist Destinations 4 U
ReplyDeleteTourist Destinations 4 U: Ultimate Guide to Unforgettable Tourist Destinations in India
Welcome to Tourist Destinations 4 U! Explore the best tourist spots across India, including hill stations, backwaters, historical sites, UNESCO World Heritage locations, waterfalls, and more. Discover hidden gems, vibrant cultures, thrilling adventures, and iconic monuments. Whether you're a nature lover, history enthusiast, or adventure seeker, this blog is your ultimate travel guide to India's diverse and stunning destinations. Plan your next journey with us!
https://touristdestinations4u.blogspot.com/
Mendzone
ReplyDeletehttps://www.mendzone.in
Book Corporate Wellness, Employee Wellness, Health Checkup Packages. Blood tests, Radiology, OPD Insurance, Doctor Consultation, Cashless, Online Booking
Full body health checkup
Blood Test at Home
Corporate Health checkup
more details visit: www.mendzone.in
Healthy Roots & Habits is your ultimate guide to holistic health and natural living. We focus on nutrition, exercise, natural remedies, and sustainable habits to help you achieve long-term well-being. Discover tips on nutrient-rich foods, fitness routines, stress-reduction techniques, and wellness solutions for men and women. Our mission is to inspire you to embrace simple, practical, and rooted habits for a balanced and vibrant life. Join us on a journey to better health and wellness. https://healthyrootsandhabits.blogspot.com/
ReplyDeleteI had HIV I was told there was no cure except medication that can control it, I totally lost hope, all I could think was losing my life because I was so depressed and confused about the whole situation , few weeks ago I read about Dr Mathew natural herbalist which was guaranteed, I ordered the medicine after using it for 2 weeks I went for test and I tested negative I am so excited to share my testimony, all thanks to Dr Matthew, you can also contact Dr Matthew via WhatsApp or call +2349063784396 OR herbalistmatthew@gmail.com , Dr Matthew also have medications for, Kidney failure ,Diabetes 1/2, CANCER, ALS (Lou Gehrig’s disease), Hepatitis A/B, chronic pancreatitis, Emphysema, COPD (Chronic , Obstructive Pulmonary Disease), asthma, Acute angle-closure Glaucoma, CHRONIC PANCREATITIS thanks everyone God bless.
ReplyDeleteI was diagnosed with Idiopathic Pulmonary Fibrosis (IPF) four years ago, and despite prescription medications, my symptoms worsened. Out of desperation, I tried an herbal treatment program from NaturePath Herbal Clinic. Within a few months, my breathing improved, chest tightness eased, and I regained energy and stamina. It’s been life-changing I feel better than I have in years. If you or a loved one is struggling with IPF, I highly recommend their natural approach: www.naturepathherbalclinic.com
ReplyDeleteI thought the physicians said there is no cure for HSV 2!!! I am telling you today that DR. Oliver cured HSV 2 with herbal medicine and his cure is forever, it is never reversible, I have been suffering from this deadly disease called HSV 2 for more than 2years and lost all hope because my doctor says there is no cure for HSV 2. Brethren I saw a testimony on the internet on how DR. Oliver cured HSV, Hepatitis etc. with his herbal medication and an email and WhatsApp to contact him was also displayed, I thought this was a joke but I decided to contact him and he replied telling me not to worry that my problem is over . DR Oliver sent me a herbal medication to drink for one month but after only 2weeks I felt strange and I went to my doctor and he confirmed me negative. He can help you too. Contact him via WhatsApp contact: +2349011671629 Email address: Droliverherbalcenter@gmail.com He is capable of curing FIBROID, HERPES, HPV, HSV1&2, HEPATITIS A B C, and DIABETES VITILIGO.
ReplyDeleteI NEED A HELP HOW TO RECOVER MY LOST CRYPTOCURRENCY
ReplyDeleteI know many things could have gone wrong these past few days investing online and getting burnt. I was also in your shoes when I invested in a binary option where I got scammed of $3000 of BTC but thanks to the help of TSUTOMU SHIMOMURA They assisted me in recovering back my lost BTC. I initially didn’t trust them but I was referred to by a friend who I trust well. I was able to get my refund within the space of 24HRS. Thanks to TSUTOMU SHIMOMURA, you can also contact them Email tsutomushimomurahacker@gmail.com, and I’m sure you will be happy you did.
There are herbal therapies that could totally eradicate HIV/AIDS from the body. Just Like Herbalist Dr Itua Traditional Medicines, there have been proofs and lots of testimonies to that effect. I took my time to investigate this Herbalist Dr Itua Products on how his herbs Effectively cured my friend Patterson and his girlfriend who contracted this embarrassing Virus As well and Lupus. I was astonished which made me other for the product, I am glad to be fully cured of HIV/AIDS . Do not let doubt hinder you from being healthy again. This herbalist Dr Itua is a genuine man , Contact Herbalist Dr Itua via his email: ituahealer@gmail.com. TELEPHONE him +2348150223558
ReplyDeletePlease do not die in pains while Allowing doubt to make you lose this opportunity
I was diagnosed with human papilloma virus (HPV) 4 years ago and i met a doctor he told me there is no cure and i have be taking some medication the warts multiplied when trying to removed them and it got me embarrass and pains, luckily few weeks ago i was recommend to Dr Ogedegbe for natural treatment after one week i got 100% cure and all the wart and pains got disappeared, i shared this post because its part of my life experience, incase anyone need speedy help about this cure email Dr Ogedegbe via dr.ogedegbe6@gmail.com or Whatsapp him now on +2349121737553
ReplyDelete